Vehicles (legacy)
This page documents the legacy Qualifier interface. Unless a task is only available there, the User Guide covers the interface you see when you sign in.
To reach the legacy interface, set the Next-Gen UI toggle in the top bar to Off.
The legacy Vehicles page organizes vehicle details and recorded data by Vehicle Identification Number (VIN). Start from a VIN to reach its trips, events, DTCs, and related records.
- How-To Guides
- Accessing the Vehicles (Legacy) page
- Understanding the user interface
- Filtering vehicles
- Loading vehicle data
- Upper table
- Lower table
How-To Guides
The following tasks are associated with the Vehicles page:
Accessing the Vehicles (Legacy) page
Note about site switching: Some Qualifier customers have access to more than one set of Qualifier data. For example, some large manufacturers have separate Qualifier sites in different regions of the world. If this is the case for you, you can switch from one site to another using the drop-down in the upper right corner of the window.
Currently, if you perform a site switch while on the Vehicles (Legacy) page, you will get an error message. To avoid this error, perform the site switch from the Next-Gen Vehicles page or the Home page.
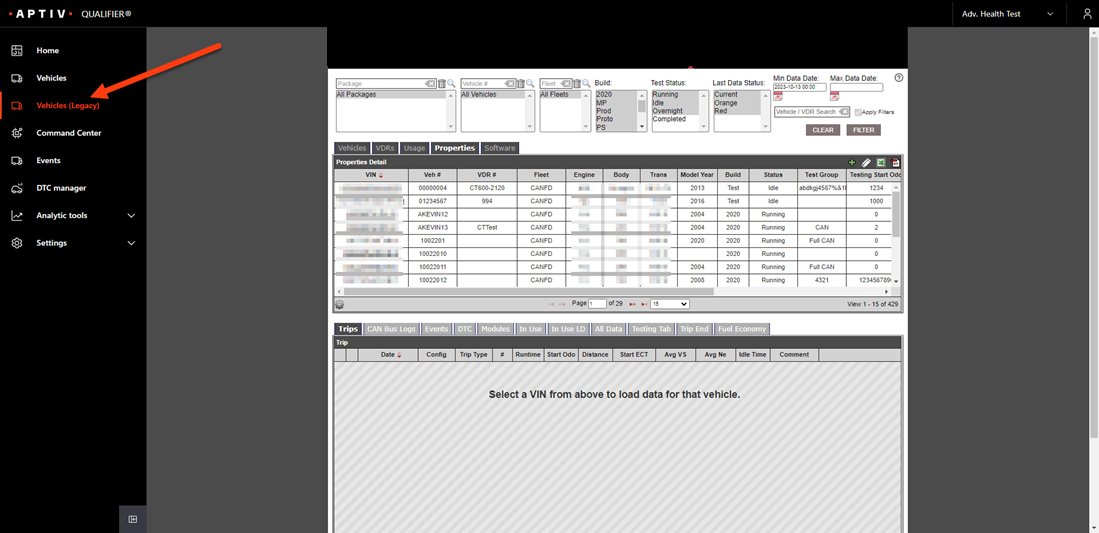
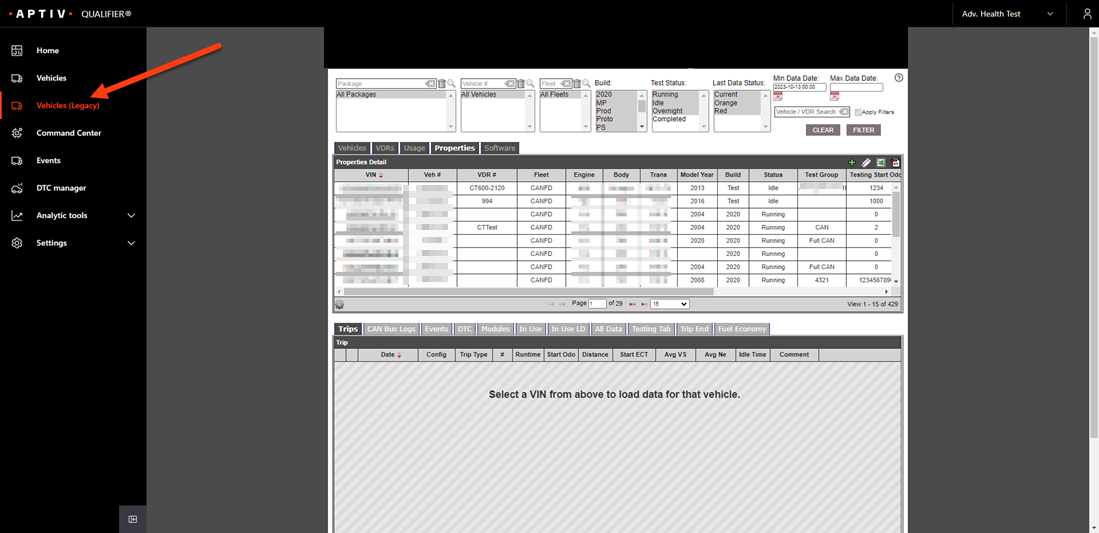
Clicking Vehicles (Legacy) opens the Legacy Qualifier Vehicles page within the Next-Gen Qualifier interface.
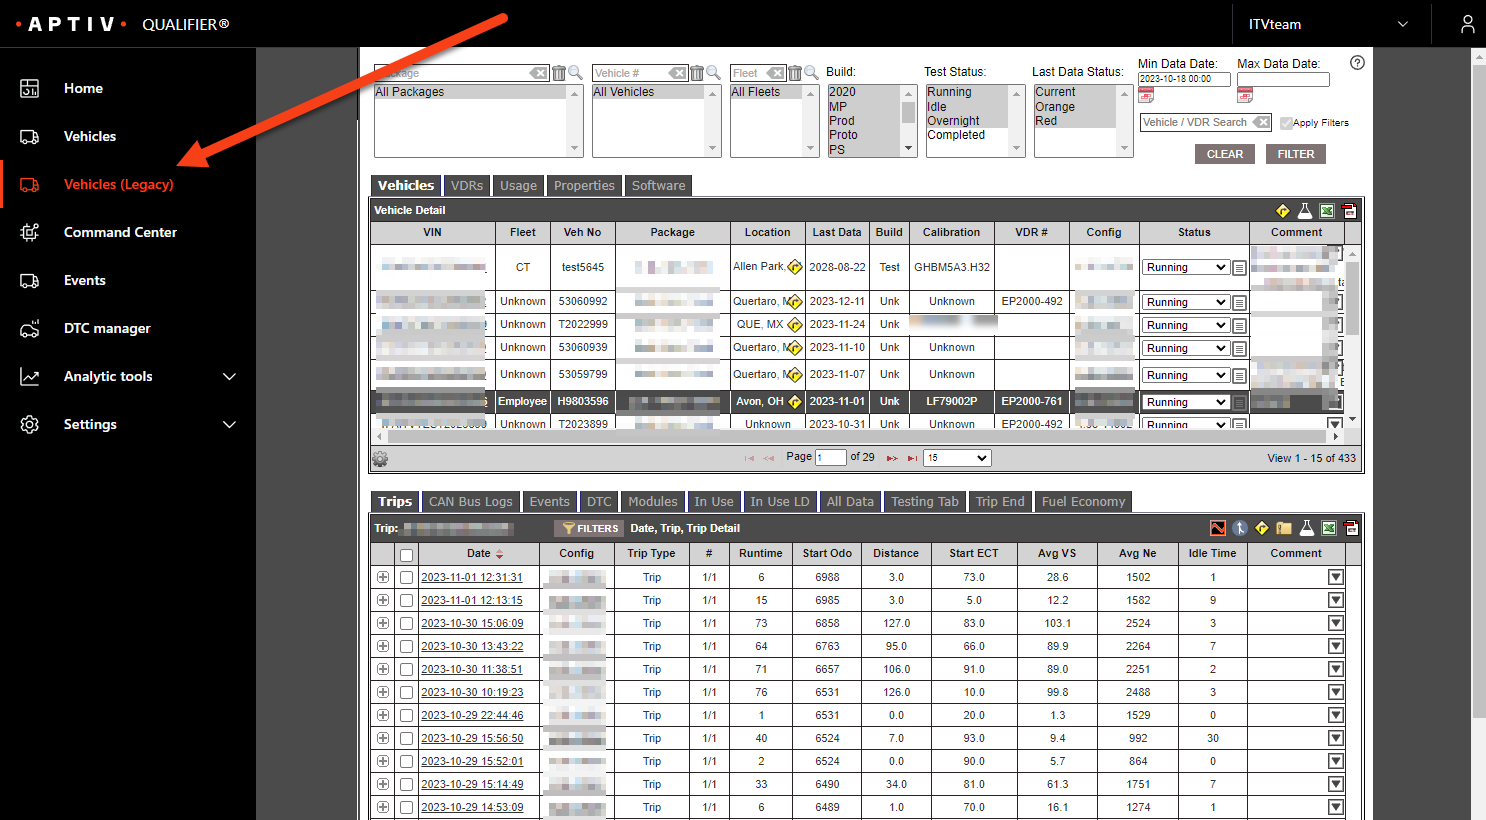
Understanding the user interface
The upper table lists all vehicles within filters and presents information about them on the different tabs.
The lower table contains all the data for the vehicle selected in the upper table.
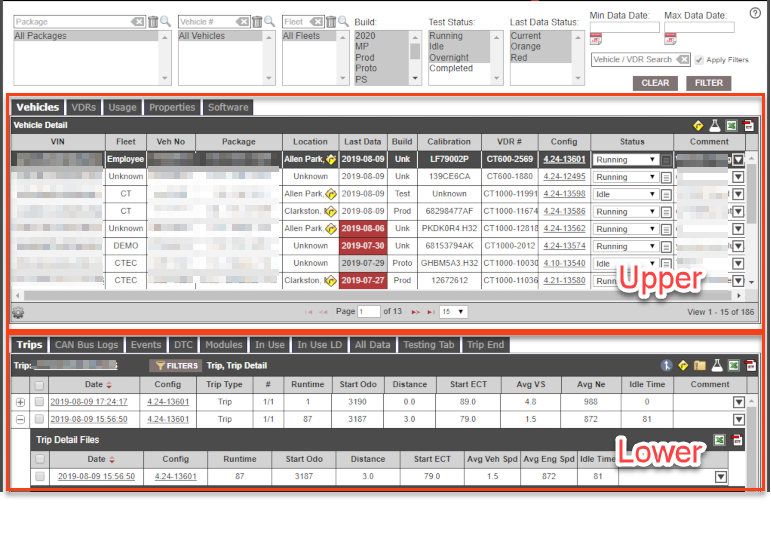
Filtering vehicles
Using the selection boxes at the top of the Vehicle page (shown in Figure below), you can filter what data is displayed. A left mouse click selects one of the options displayed; Ctrl + left click adds or removes additional selections.
You can turn off all filters by unchecking the Apply Filters option.
Loading vehicle data
When you select a vehicle row in the upper table, Qualifier populates the data tabs in the lower table.
Upper table
Vehicles tab
The Vehicles tab lists all the vehicles in the selected filters. This tab shows the last known information about the vehicle, which you can use for fleet management.
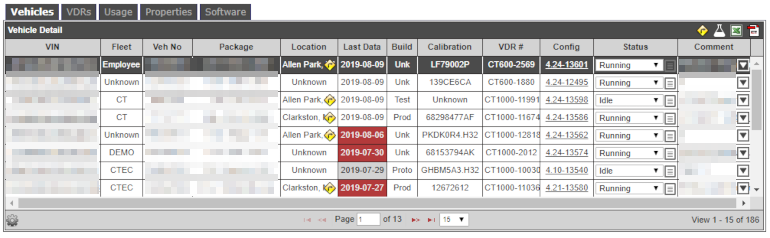
Location displays the last known location as determined by GPS. Clicking the yellow right turn icon will show the vehicle location on a map.
Last Data displays the time stamp of the last data file received from the vehicle. The Last Data cell has conditional formatting that will turn the cell orange if there has been no data from this vehicle in more than two days. The cell will turn red if there has been no data in more than three days. These timeframes can be changed by the customer, if desired. If the vehicle Status (see description below) is set to Idle, the cell will turn gray.
Calibration displays the current (or last known) software or hardware ID from a pre-configured module of choice. The value populated can be the software or hardware ID from any module as long as the data logger is in communication with it. The column heading is also configurable.
VDR # displays the Vehicle Data Recorder serial number.
Config displays the Data Acquisition software version followed by the configuration number currently running in the vehicle.
Status indicates the operational state of the vehicle. Vehicles can be set to Idle, Completed, Running, Overnight, or any customer-defined states. Vehicles that are set to Idle will always have gray Last Data cells and will NOT turn red or orange after extended periods without data.
Vehicles set to Completed are turned off in the filters by default.
Comments can be added to vehicles by clicking the down arrow in the Comment cell. All comments are tagged with the user who entered the comment and the time stamp. Mouse over the expand icon in the comment cell to get a pop up of all comment history.
You are able to edit and delete your comments by using the pencil icon, or delete comments using the trash icon.
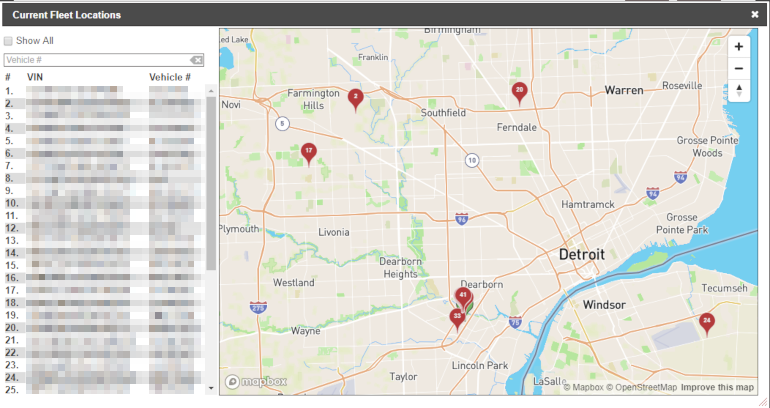
Fleet Tracker displays the last known GPS location of all fleet vehicles on a global map. To access Fleet Tracker, click the yellow right turn icon at the top right of the upper table (see Figure below). Individual vehicles can be selected by clicking pins on the map or by selecting a vehicle in the left hand legend. The pin color for each vehicle indicates whether the VDR is running (green) or off (red).
The beaker icon launches the DATALAB feature. DATALAB is an advanced data analytics platform which enables deeper understanding and information from your test fleet.
See DATALAB to learn more about this feature.
VDR tab
The VDR tab is where Qualifier displays Pulse data for the fleet.
Pulse data is information that is transmitted from the vehicle, typically every two minutes, when the data recorder is on and has a cellular signal. The primary function is to ensure the VDR is up to date, communicating with the server, and able to collect data.
Below is an example of how Pulse data might appear. Because Pulse data is customizable, your view may be slightly different.
Pulse must be enabled and a VDR must have sent a pulse to the server for it to show up on this tab.
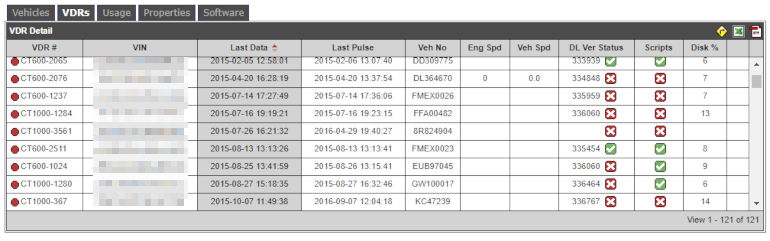
VDR # displays the Vehicle Data Recorder serial number and indicates if the VDR is online. Green indicates the VDR is online, yellow indicates online but no activity in last 10 minutes, and red indicates offline.
Last Data shows the time stamp when the VDR last uploaded a data file (including parameter information) to the server.
Last Pulse shows the last time stamp when the VDR sent pulse data was uploaded.
Config shows the configuration number that is currently running on the VDR.
DL Ver Status indicates the data acquisition software version that is running on the VDR. A green checkmark icon indicates it is running up to date data acquisition software. A red X icon indicates there is a newer version on the server that the VDR needs to download.
Disk % shows the amount of storage on the VDR that is being utilized.
The yellow right turn icon will show a map of the current GPS location of the vehicle if it is online. If the vehicle is offline, it will display the last known GPS location. While the vehicle is online, its location can be tracked in real time (at two minute intervals) with this utility or Fleet Tracker.
Usage tab
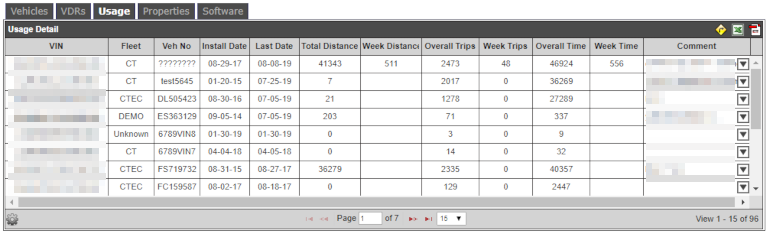
The Usage tab helps test fleet managers track how their vehicles are running. It shows statistics for distance, trips, and time.
The columns for week statistics are populated only if the vehicle has run in the previous seven days. Also, the VDR must be collecting an odometer reading for Qualifier to display distance calculations.
Properties tab
The Properties tab shows vehicle level information. It can be tailored to show a large range of information related to a vehicle. You can work with your Aptiv representative to set up additional information.
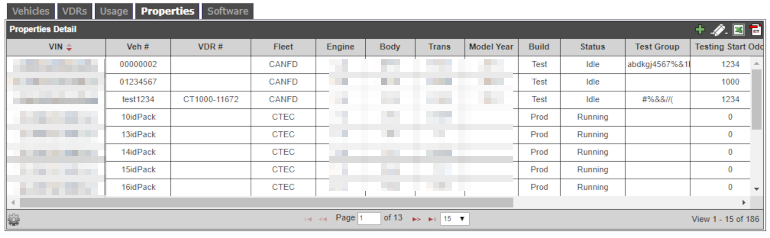
People with specified access levels have the ability to edit these fields for a vehicle. If you have edit permissions, you will see a pencil icon appear when you hover over the cell. Click this icon to edit the field.
Edit options are controlled by your Aptiv CSE and can take any of the following forms:
- free form field
- drop-down menu
- drop-down menu with a free form field to add a new entry to the drop-down
Hit the enter key to submit the changes and click Ok on the pop up window to accept the changes on any edits you’ve made.
Users with certain access levels also have the ability to add a VIN to the system. This is useful in situations where the ECU is not programmed with the VIN for the data acquisition system to record automatically. Contact your Aptiv representative for help with this feature.
Adding multiple VINs via batch edit
You can also add multiple VINs via a CSV file by clicking the Batch Edit icon identified in the screenshot below:
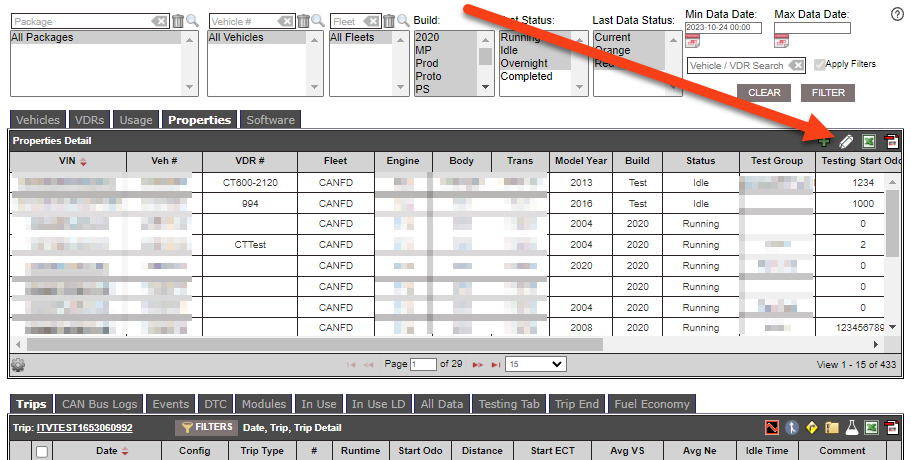
To learn more, see How to Add a Group of Vehicles to Qualifier.
Software tab
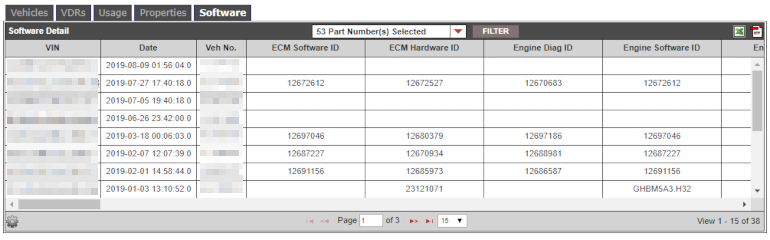
The Software tab shows the Software and Hardware IDs that have been configured for each vehicle. The values on this tab are the most recent IDs for the time stamp shown.
You can also apply a filter to select what IDs are shown.
Lower table
Trips tab
The Trips tab displays all the Trip and Trip Detail files of the selected vehicle.
Trip and Trip Detail files display the data collected during a given drive cycle. A drive cycle is defined by the power strategy chosen by your organization. For example, many organizations define a drive cycle as key off to next key off.
Qualifier will break a drive cycle into separate files if the file size limit is reached. These separated files are the Trip Detail files, which contain every parameter in the configuration.
In order to better organize and view a full drive cycle, Qualifier generates a Trip file. The Trip file contains the data from the entire drive cycle, but only select parameters are written to this file. Contact your Aptiv CSE for changes to the parameter list.
The data in the Trips tab includes summarized information for each drive cycle on Runtime, Starting Odometer, Distance Traveled, and various other options that can be configured per customer. You can also add a comment for each Trip or Trip Detail using the comment field.
The main view contains all the Trips and their data. You can access the data for these files by clicking the row for the data of interest. This menu gives you options for viewing the data.
| Icon | Description |
|---|---|
| Graphs the Trip data in Qualifier’s integrated graphing utility AC-Graph. | |
| Downloads a CSV file of the Trip data to your computer. | |
| Downloads a MDF file of the Trip data to your computer. | |
| Downloads a MDF 4.0 file of the Trip data to your computer. | |
| Launches a browser window with the Trip Summary Log. | |
| Downloads a zip file containing a file for each Trip Detail file. | |
| Launches a window showing the GPS route for the Trip. |
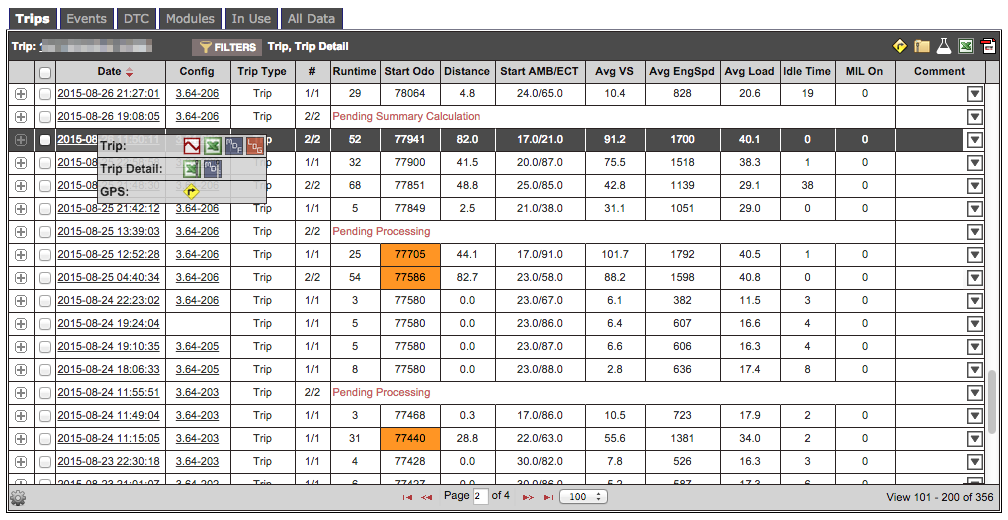
In the image above, the Start Odo cell is highlighted orange in some rows. This is conditional formatting to let the user know that there is a range of distance missing where the VDR was not collecting data.
Also above, there are rows where it says Pending Processing and Pending Summary Calculations.
Pending Processing means that either the Trip Summary Log or not all of the Trip Detail files have been processed yet. Therefore, the request for summary calculations cannot be submitted. If you mouse over the plus sign next to the Trip row it will show whether the Trip Summary Log has been processed. If it is Yes, it will list the time stamps of the Trip Detail files that have been processed thus far. In the # column, if the Trip Summary Log has not been processed, you will see a ? for the total number of trips. Otherwise, it will give the actual total number from the Trip Summary Log.
Pending Summary Calculations means that Qualifier has processed all the files but is still processing the summary calculations.
When you expand the Trip row, Qualifier displays all the Trip Detail entries for the Trip file above it. Click the row for the data of interest to access the menu for viewing the Trip Detail data.
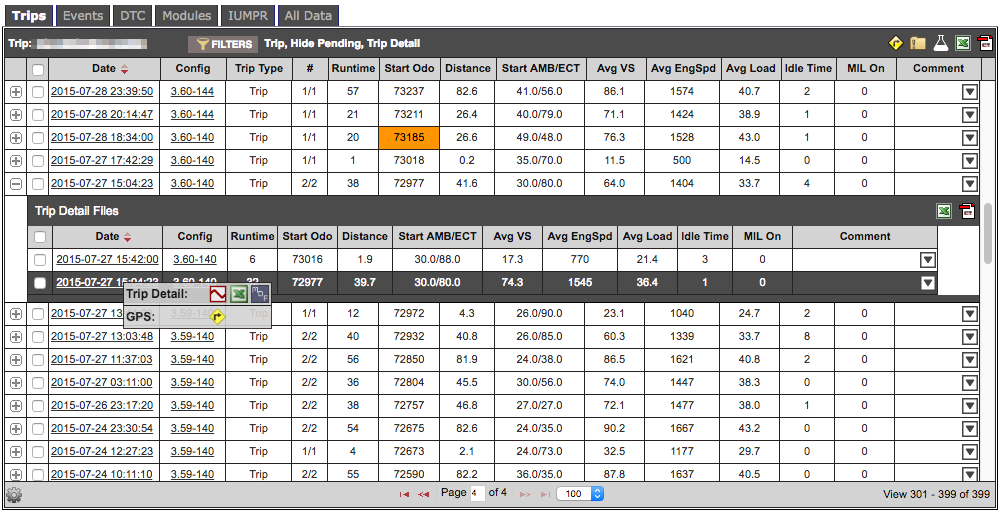
You can filter the information in this table by clicking the Filters button in the toolbar of the lower table. This will launch a window that gives various forms of filtering. There are general filters for Date and Pending Trips.
There is then a section for filtering the Trip files and a section for filtering the Trip Detail files, which allows you to filter on any of the columns of this table.
You can go back to the default filtering by clicking the Reset to Defaults button. You can also disable all filtering, including the default filters, by clicking Disable All. Use the Apply All button to apply the filters when you are done making all your selections or click the X to exit out of the filtering menu without making any changes.
See the video in the Loading Vehicle Data section for a demo of Filtering.
The Trips tab toolbar provides other ways of looking at the data. The icons on the right of the toolbar are all for viewing or downloading data from multiple trips.
The yellow right turn icon is for viewing multiple GPS routes in one map. Select the Trip files from the table and click the icon to launch the map.
See the video below for a demonstration:
GPS-Concat.webm
Some additional icons are introduced, which are explained in the table below:
| Icon | Description |
|---|---|
| The video above introduces the blue Google Earth icon. Clicking this icon downloads a KML file of the selected GPS data. You can upload KML files into Google Earth and similar tools. | |
| First select multiple files, then click this icon to open several files in one zipped folder. The multi-file download icon will give you the option to choose the file format. | |
| Launches the DATALAB feature. DATALAB is an advanced data analytics platform which enables deeper understanding and information from your test fleet. |
Events tab
The Events tab displays the events for the selected vehicle. Events are data files captured at a high-speed data rate when pre-defined trigger limits are met during vehicle operation. The triggers are defined in the configuration from input provided by the customer. Typically, event files are composed of 60 seconds of pre-trigger and 10 seconds of post-trigger data, although this is customizable. The VDR can record a full CAN Log with any event file.
| Icon | Description |
|---|---|
| Graphs the Trip data in Qualifier's integrated graphing utility AC-Graph. | |
| Downloads a CSV file of the Trip data to your computer. | |
| Downloads an MDF file of the Trip data to your computer. | |
| Downloads a MDF 4.0 file of the Trip data to your computer. | |
| Downloads an ASC file of the CAN log during the event to your computer. This will only be present if the CAN log is enabled for the event. | |
| Launches a browser window with the Trip Summary Log. | |
| Launches the audio file taken for that event. | |
| Launches the video file taken for that event. | |
| Launches a window showing the GPS route for the Trip. |
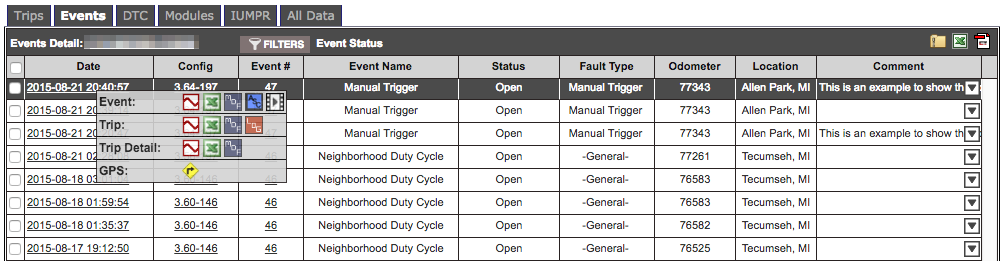
The toolbar of this table gives options for filtering by Date, Event Status, and Event Type.
There are default settings for these filters, so if you are not seeing your file, turn off all the filters and look again.
DTC tab
The DTC tab is much like the Events tab but it displays the Diagnostic Trouble Codes (DTCs) for the selected vehicle. DTCs are data files captured with the DTC Manager feature, which queries configured modules for DTCs at a predefined rate and continually tracks their status. DTC files are composed of 60 seconds of pre-trigger and 10 seconds of post-trigger data. There is also a full CAN log captured at the same time and available in ASC format.
You can view or download the data for these events by clicking the row for the data of interest. The Event and corresponding Trip Detail data are both available from this menu.
| Icon | Description |
|---|---|
| Graphs the Trip data in Qualifier's integrated graphing utility AC-Graph. | |
| Downloads a CSV file of the Trip data to your computer. | |
| Downloads a MDF file of the Trip data to your computer. | |
| Downloads a MDF 4.0 file of the Trip data to your computer. | |
| Downloads an ASC file of the CAN log during the event to your computer. This will only be present if the CAN log is enabled for the event. | |
| Launches a browser window with the Trip Summary Log. | |
| Downloads a TXT file of the Environmental Parameters or Freeze Frame data. | |
| Launches a window showing the GPS route for the Trip. |
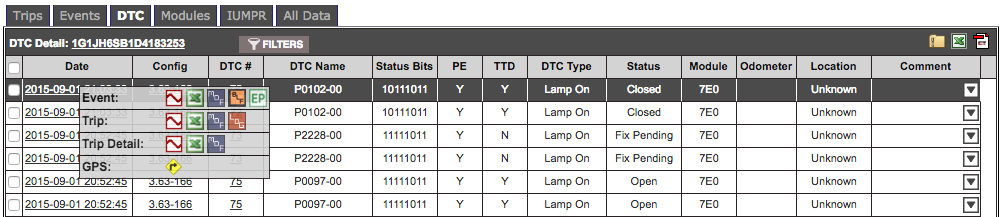
The toolbar of this table gives options for filtering by Date, DTC Status, DTC Type, and Event Type. There are default settings for these filters, so if you are not seeing your file, turn off all the filters and look again.
Hovering over the fields in this table will give additional information about the data.
Modules tab
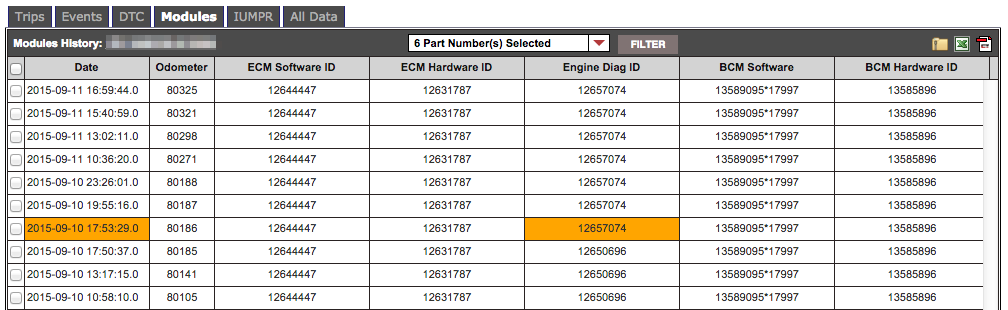
The Modules tab shows the software and hardware IDs for any module that is configured. It is similar to the Software tab in the upper table, but it shows a running history for each drive cycle.
There is conditional formatting that will highlight the cell orange when a Module ID changes. It will also highlight the date cell orange so that you can easily see when there is a module ID change when there are more module IDs than can be shown in view.
The toolbar at the top of the table allows you to filter by Date and Part Number.
In use tab
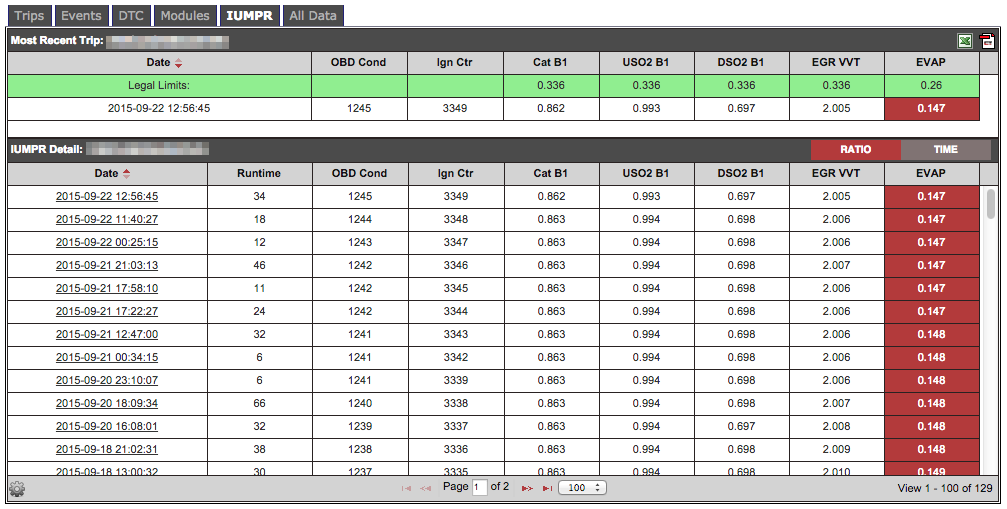
The IUMPR tab displays In-Use Monitor Performance Ratios (IUMPR). It shows the limits chosen by your organization on the top row in green, followed by the results for the history of that vehicle. Conditional formatting is used to highlight values that are not within a specified range of the limit. The cell is highlighted orange if the value is greater than or equal to the limit but less than 25% above the limit. The cell is highlighted red if the value is below the limit.
Custom tabs
Qualifier provides the ability to set up additional tabs with summary information from each drive cycle. These can be used for things like Regen Metrics, Charging Cycles, Trip Fuel Economy, etc. Please contact your Aptiv representative for more information.
All Data tab
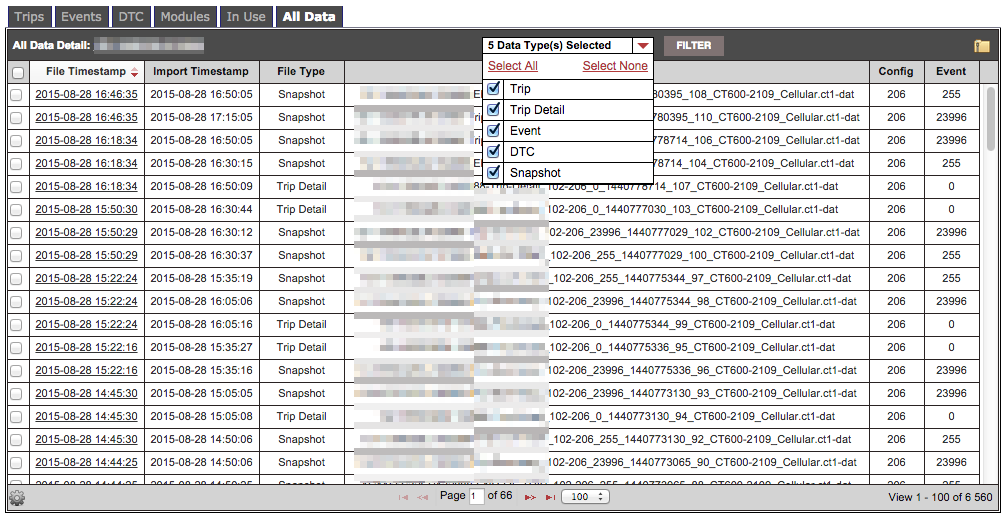
The All Data tab contains a running list of every data file that was captured during data acquisition. You can access all of the data files by clicking the row of the file of interest. The toolbar at the top of the table allows you to filter data types on and off.
This view can be useful when trying to look at all files in a chronological order. It also allows you to access snapshot data, which is not available in any other location on the Qualifier Legacy Vehicle Page.
Adding a group of vehicles
If you have the appropriate access level, you can use Qualifier's batch-add feature, which allows you to add a large group of vehicles to Qualifier at once.
To add a group of vehicles to Qualifier, follow the steps below:
- Navigate to the Vehicles (Legacy) page using the primary left navigation menu.
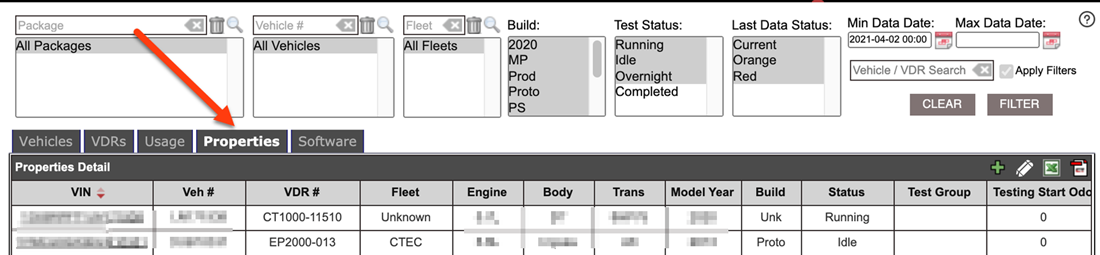
- Click the Properties tab.
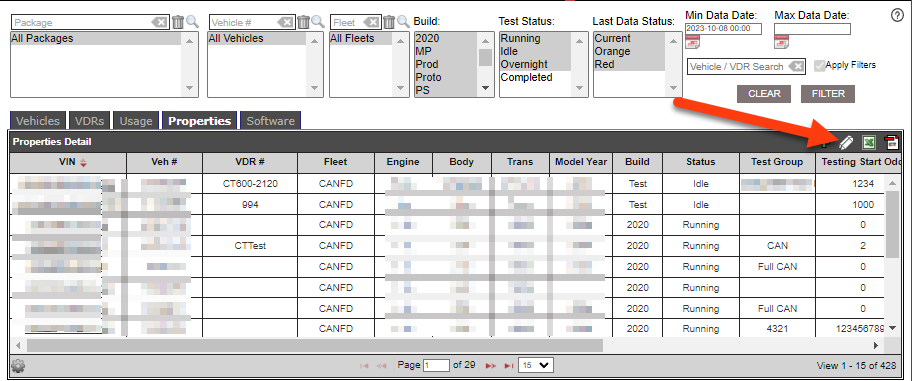
- Click the double-pencil icon next to the plus sign at the right of the page.
You will see the double-pencil icon only if you have permission to use the Batch Add feature.
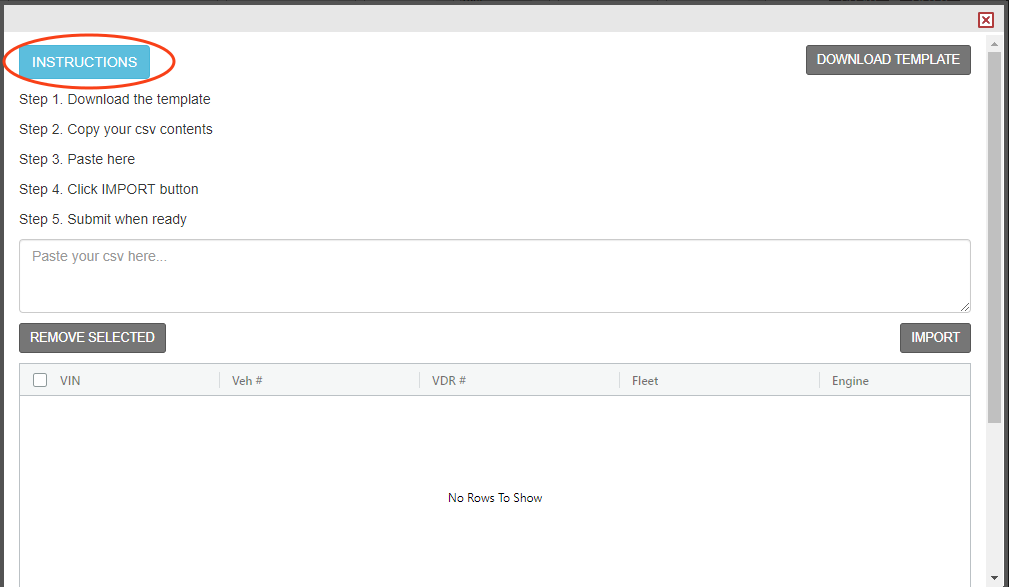
- (Optional) In the pop-up window, click the blue Instructions button to see the steps involved in the batch-add process.
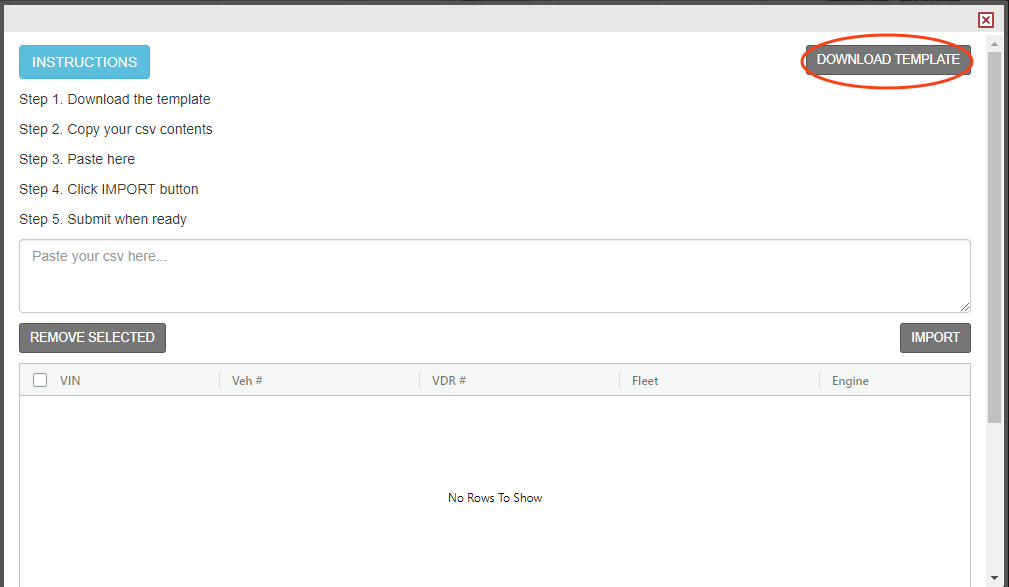
- Click Download Template.
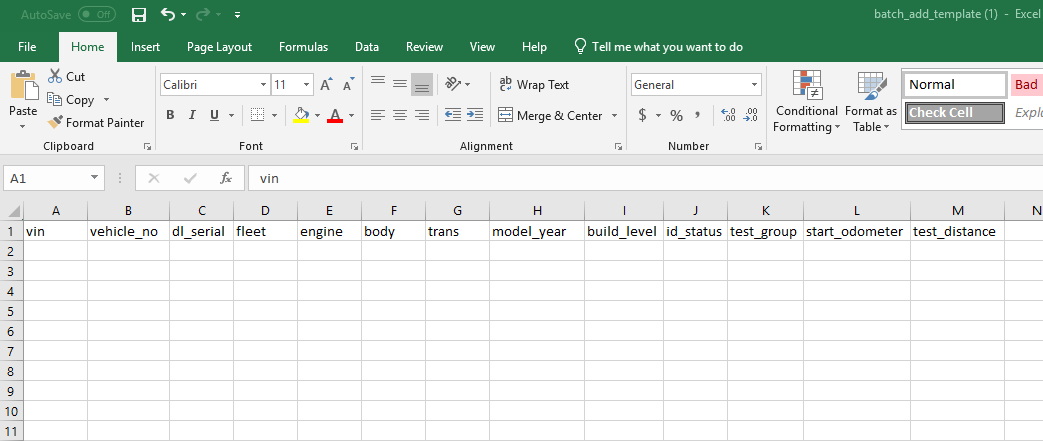
- Open the template in Excel (or another spreadsheet program) and enter the vehicle data in the appropriate columns. The blank template will look something like this:
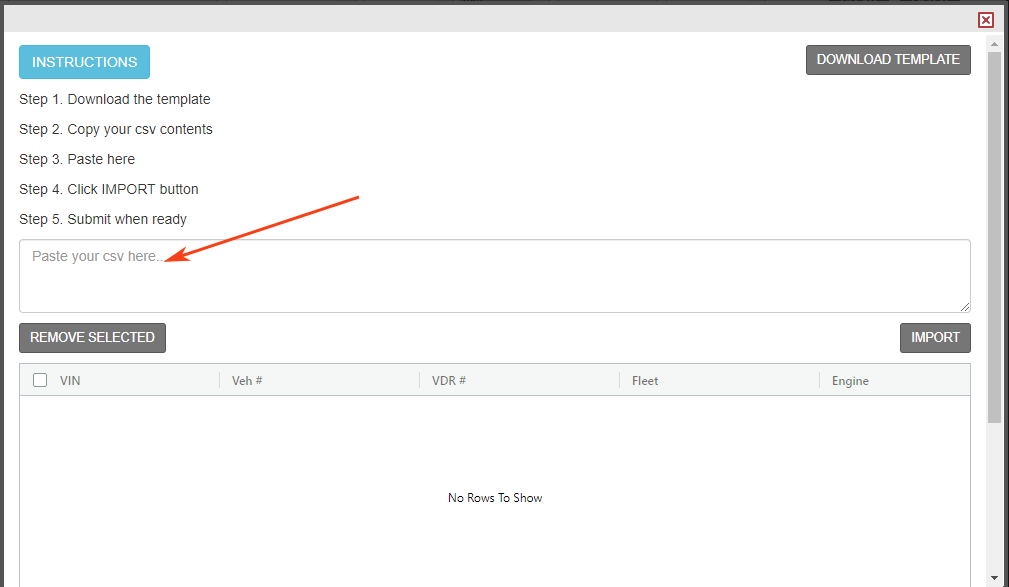
- Copy the data from your completed spreadsheet and paste it into the box that says Paste your csv here...
Make sure you include the header row from your spreadsheet table when you cut and paste your data. If you do not include the header row, the data will not import correctly. Using the Select All function should work fine.
- Click Import.
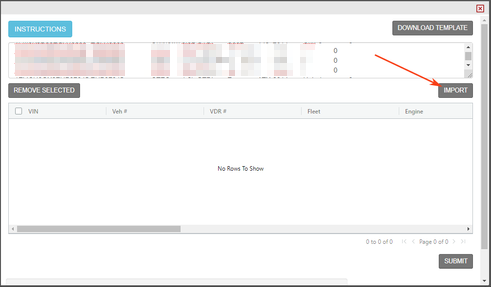
- Edit your vehicle data as necessary. If you imported the file correctly (including the table header row), the vehicle information will appear in a table in the large box on the window.
If any cells are highlighted in red, the data in those cell is not valid and cannot be added to Qualifier.
You can edit any of the columns, except for VIN and Veh # directly in the table by double clicking the appropriate cell. (These are all the same columns that are editable in the Properties tab within Qualifier.)
Editing a VIN
Editing a VIN or Veh # will require deleting all the data from the table and then redoing steps 5 through 8.
To do so, follow the instructions below:
-
Click the box to the left of the word VIN to select all the vehicles in the table.
-
Click Remove Selected.
-
Go back to your spreadsheet and alter the data as necessary.
-
Cut and paste all your data again (including the headings), replacing the current data in the CSV box.
-
Click Import and check again to make sure none of the cells are highlighted in red.
You can also delete a single row from your table by clicking the white box on the far left of the row and then clicking Remove Selected.
Updating a vehicle's package
This page provides information on how to update a vehicle’s package through the Vehicles page.
Only users with appropriate administrative permissions will be able to add vehicles. If you do not have access or need help with the process, contact your Aptiv customer support engineer (CSE).
Overview
Within Qualifier, a vehicle's package is its combination of engine, body style, and transmission.
How to update a package
To update a vehicle’s package, follow the steps below:
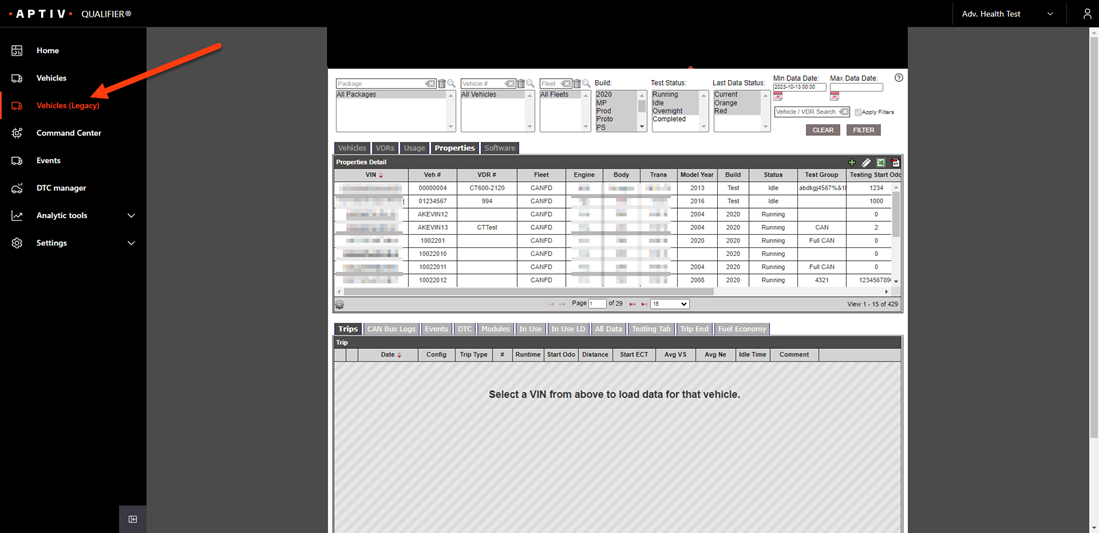
- Navigate to the Vehicles (Legacy) page using the left navigation menu in Next-Gen Qualifier. (If it loads to the Legacy Qualifier home page, click the Vehicle tab from the top navigation menu.)
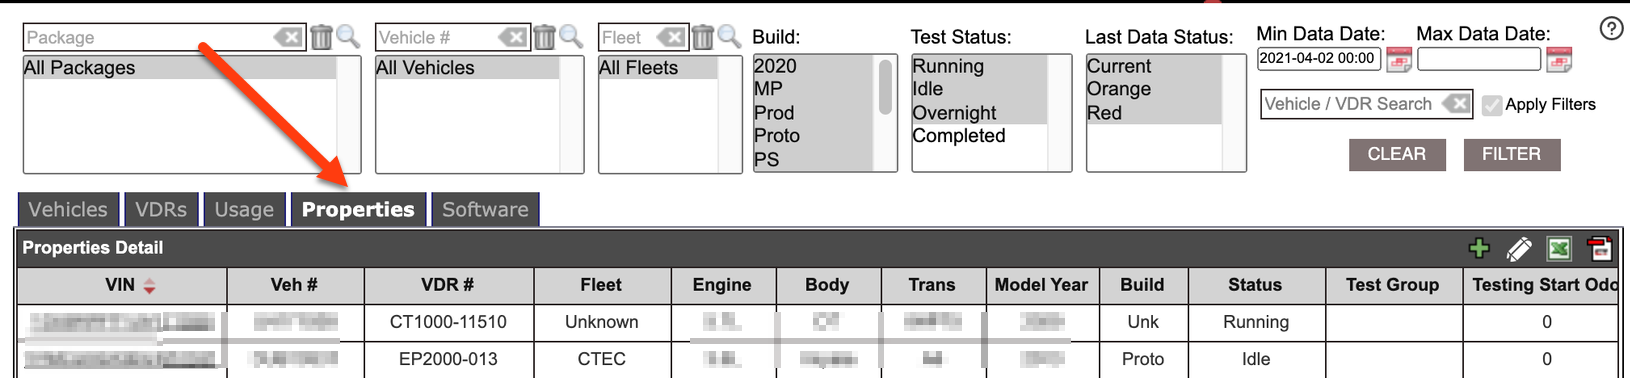
- Click the Properties tab.
- Search for the VIN you need to update.
You can scroll through the list or use the filter tools at the top of the page to help you find the correct vehicle. You can also click any of the column headings to sort in ascending or descending order.
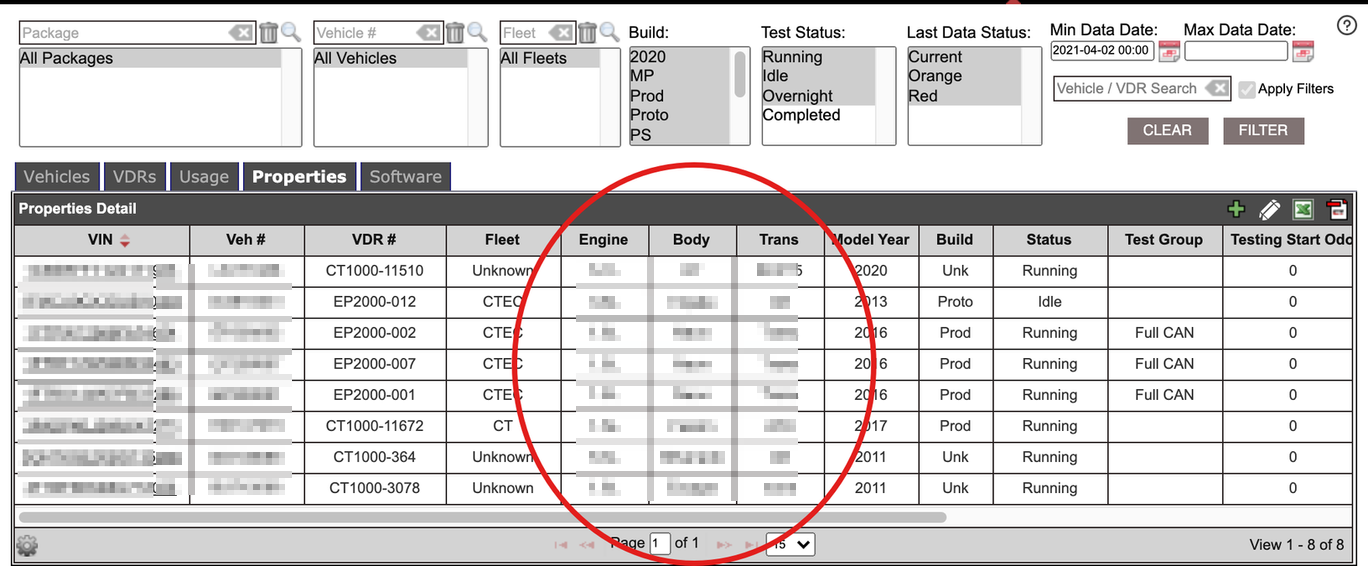
- Hover over the Engine, Body, and/or Transmission columns you want to update until a pencil icon appears.
- Click the pencil icon and a modal window will open that allows you to make your edits, as shown in the example screenshot below:
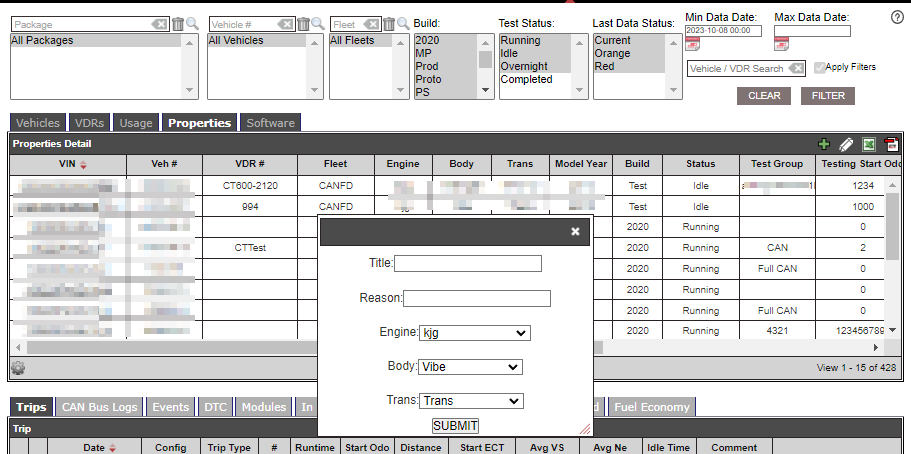
Depending on your access level restrictions, you may only be able to select from a drop-down list of values, or you may be able to type new information into the column.
- After you make a change, you’ll see a pop-up window asking if you are sure you want to update the cell. Click Ok to save the change or Cancel to exit without saving.
Adding vehicles through the Properties tab
If you have the appropriate permissions, you can add vehicles to Qualifier through the Properties tab of the Vehicles (Legacy) page.
Only users with appropriate administrative permissions will be able to add vehicles. If you do not have access or need help with the process, contact your Aptiv customer support engineer (CSE).
How to add a new vehicle
To add a vehicle to Qualifier, follow the steps below:
- Navigate to the Vehicles (Legacy) page using the left navigation menu in Next-Gen Qualifier.
-
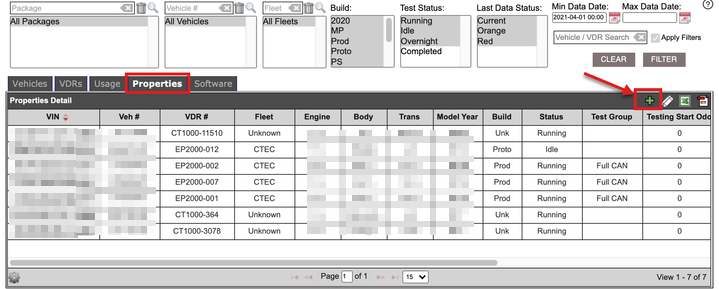
Select the Properties tab on the Vehicle screen.
-
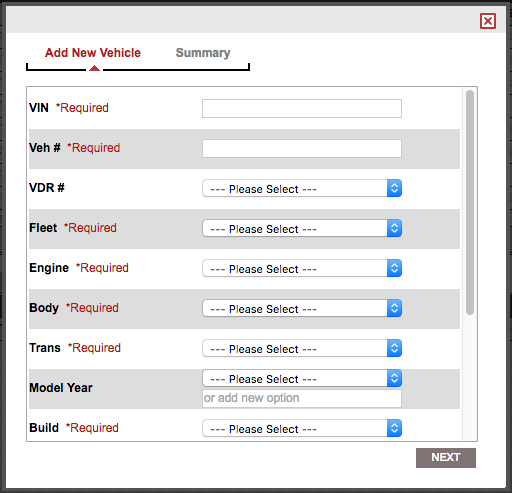
Click the green plus icon located on the right side of the Properties Detail table to open the Add New Vehiclepop-up box, as shown in the example screenshot below:
- Enter your vehicle data into the required fields (indicated in red text).
If you’d like to create new options within the drop-down lists, then you’ll need additional Qualifier permissions. To obtain those permissions, contact your Aptiv CSE.
-
Click Next after entering all the required data.
-
Confirm the information on the Summaryview. Click Save to submit the changes or Back to continue editing.