Events (legacy)
This page documents the legacy Qualifier interface. Unless a task is only available there, the User Guide covers the interface you see when you sign in.
To reach the legacy interface, set the Next-Gen UI toggle in the top bar to Off.
The legacy Events page lists datalogs captured when a predefined trigger occurs during vehicle operation. Each event file covers a configured period around that trigger.
How-to guides
The following how-to guides relate to activities you can perform within the Events page:
Accessing the Events page
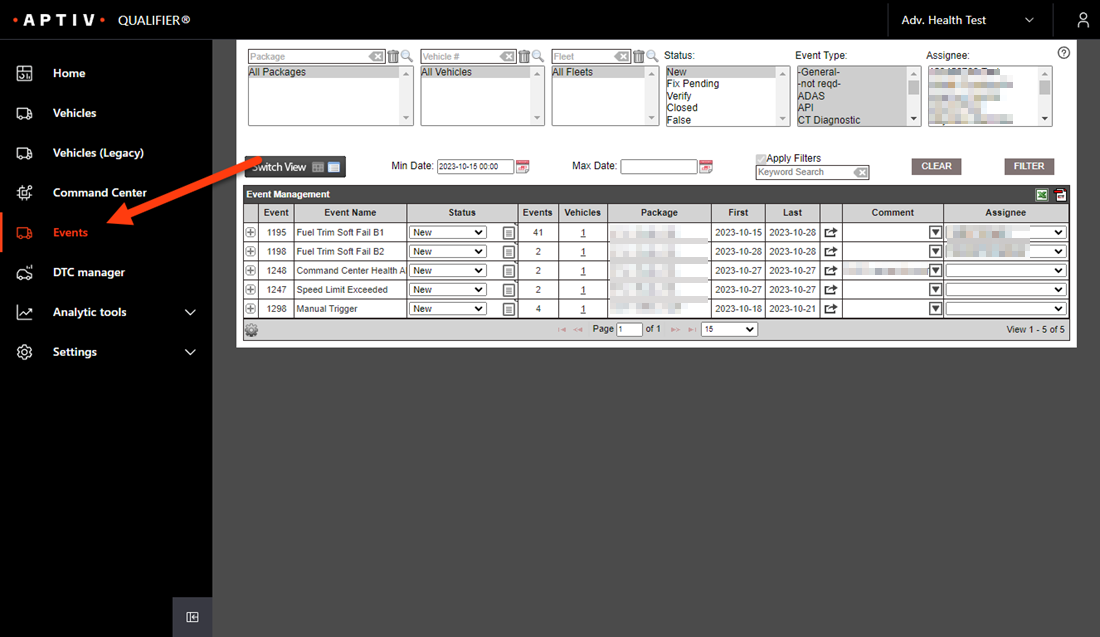
Open Events from the primary left navigation.
Clicking Events opens the Legacy Qualifier Events page within the Next-Gen Qualifier interface.
Understanding the user interface
Within the Events page, data is organized by event to help you search for specific event(s) across multiple vehicles.
Events page sections
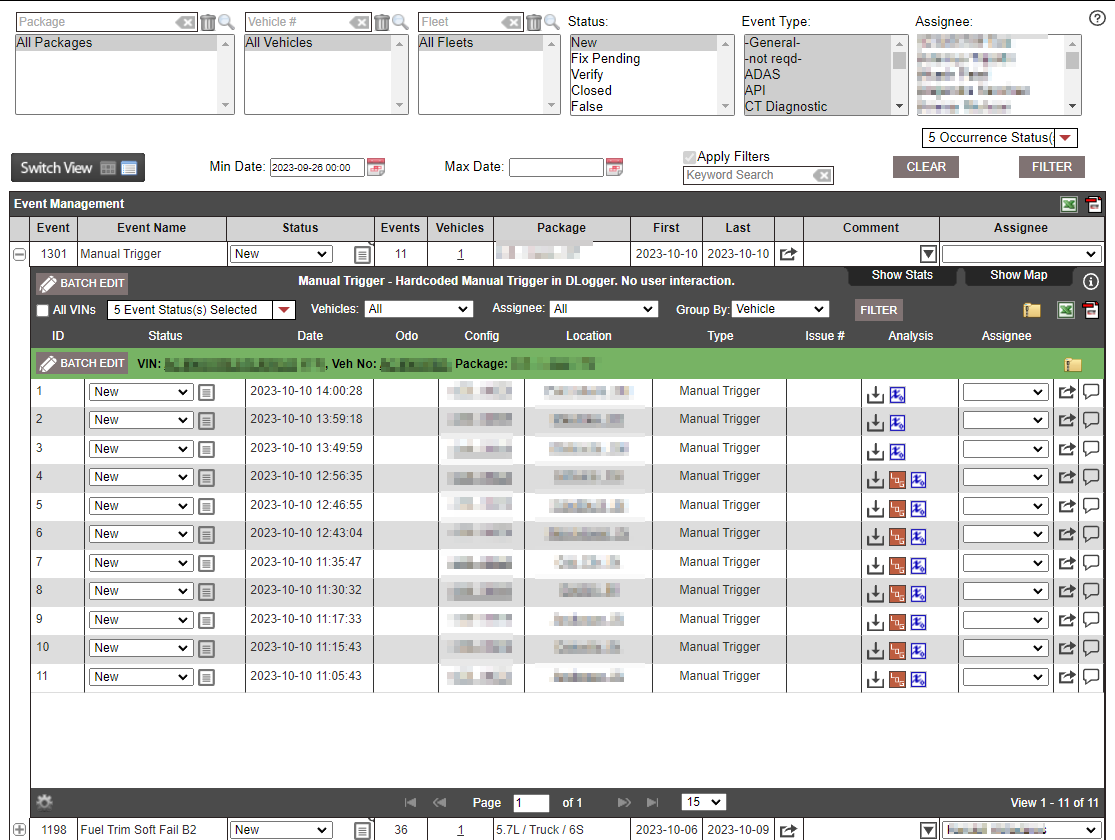
When you click the Events tab, you will see a page similar to the following:
Aptiv recommends always filtering your event data. Otherwise, Qualifier will attempt to show all the events that all your vehicles have ever experienced, taking significant time to load.
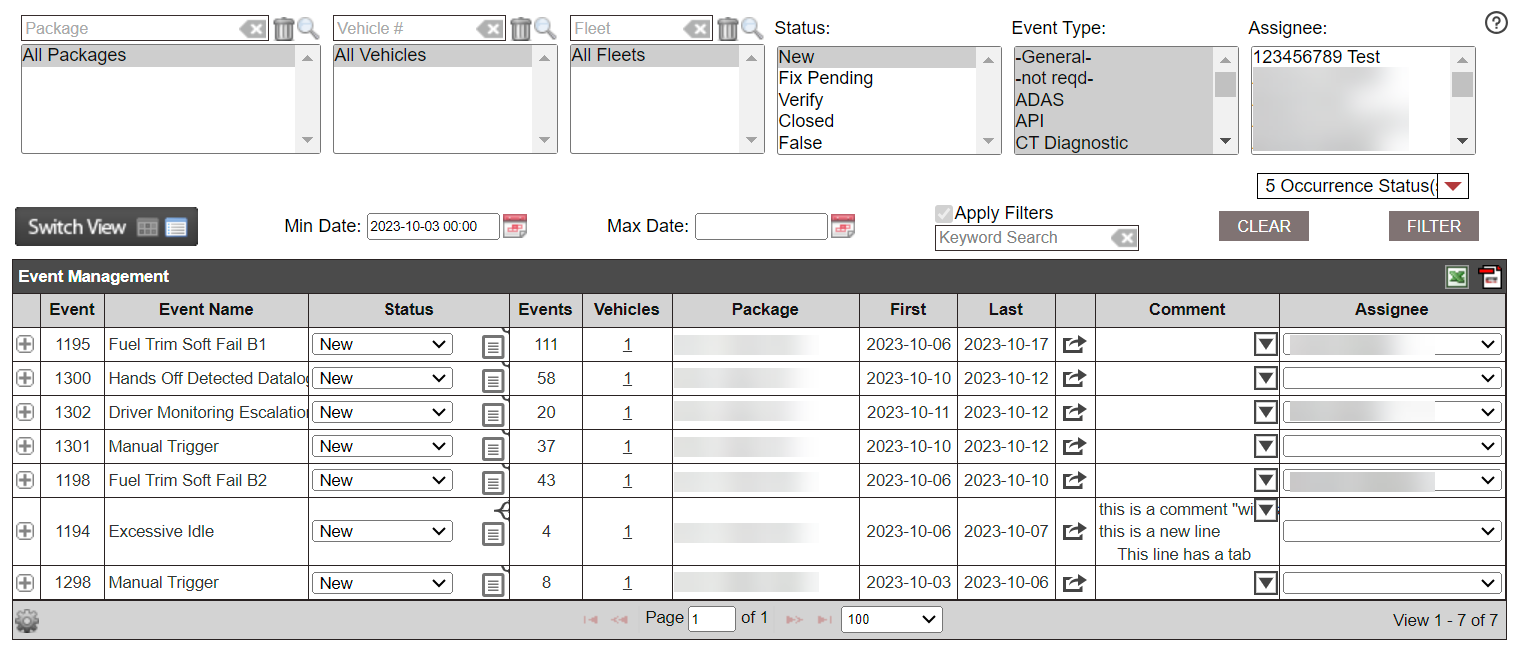
The top section of the page allows you to set filters so you only see the events you are interested in. Most companies configure Qualifier to display data covering a short period of time (usually two weeks), but you can adjust the filters however you like. If you change the filters, you will need to click the Filter button in order for your changes to take effect.

Below the filters in the main section of the page is the event data. You have two options for how to view this data. By default, Qualifier will show you the Event Management table.
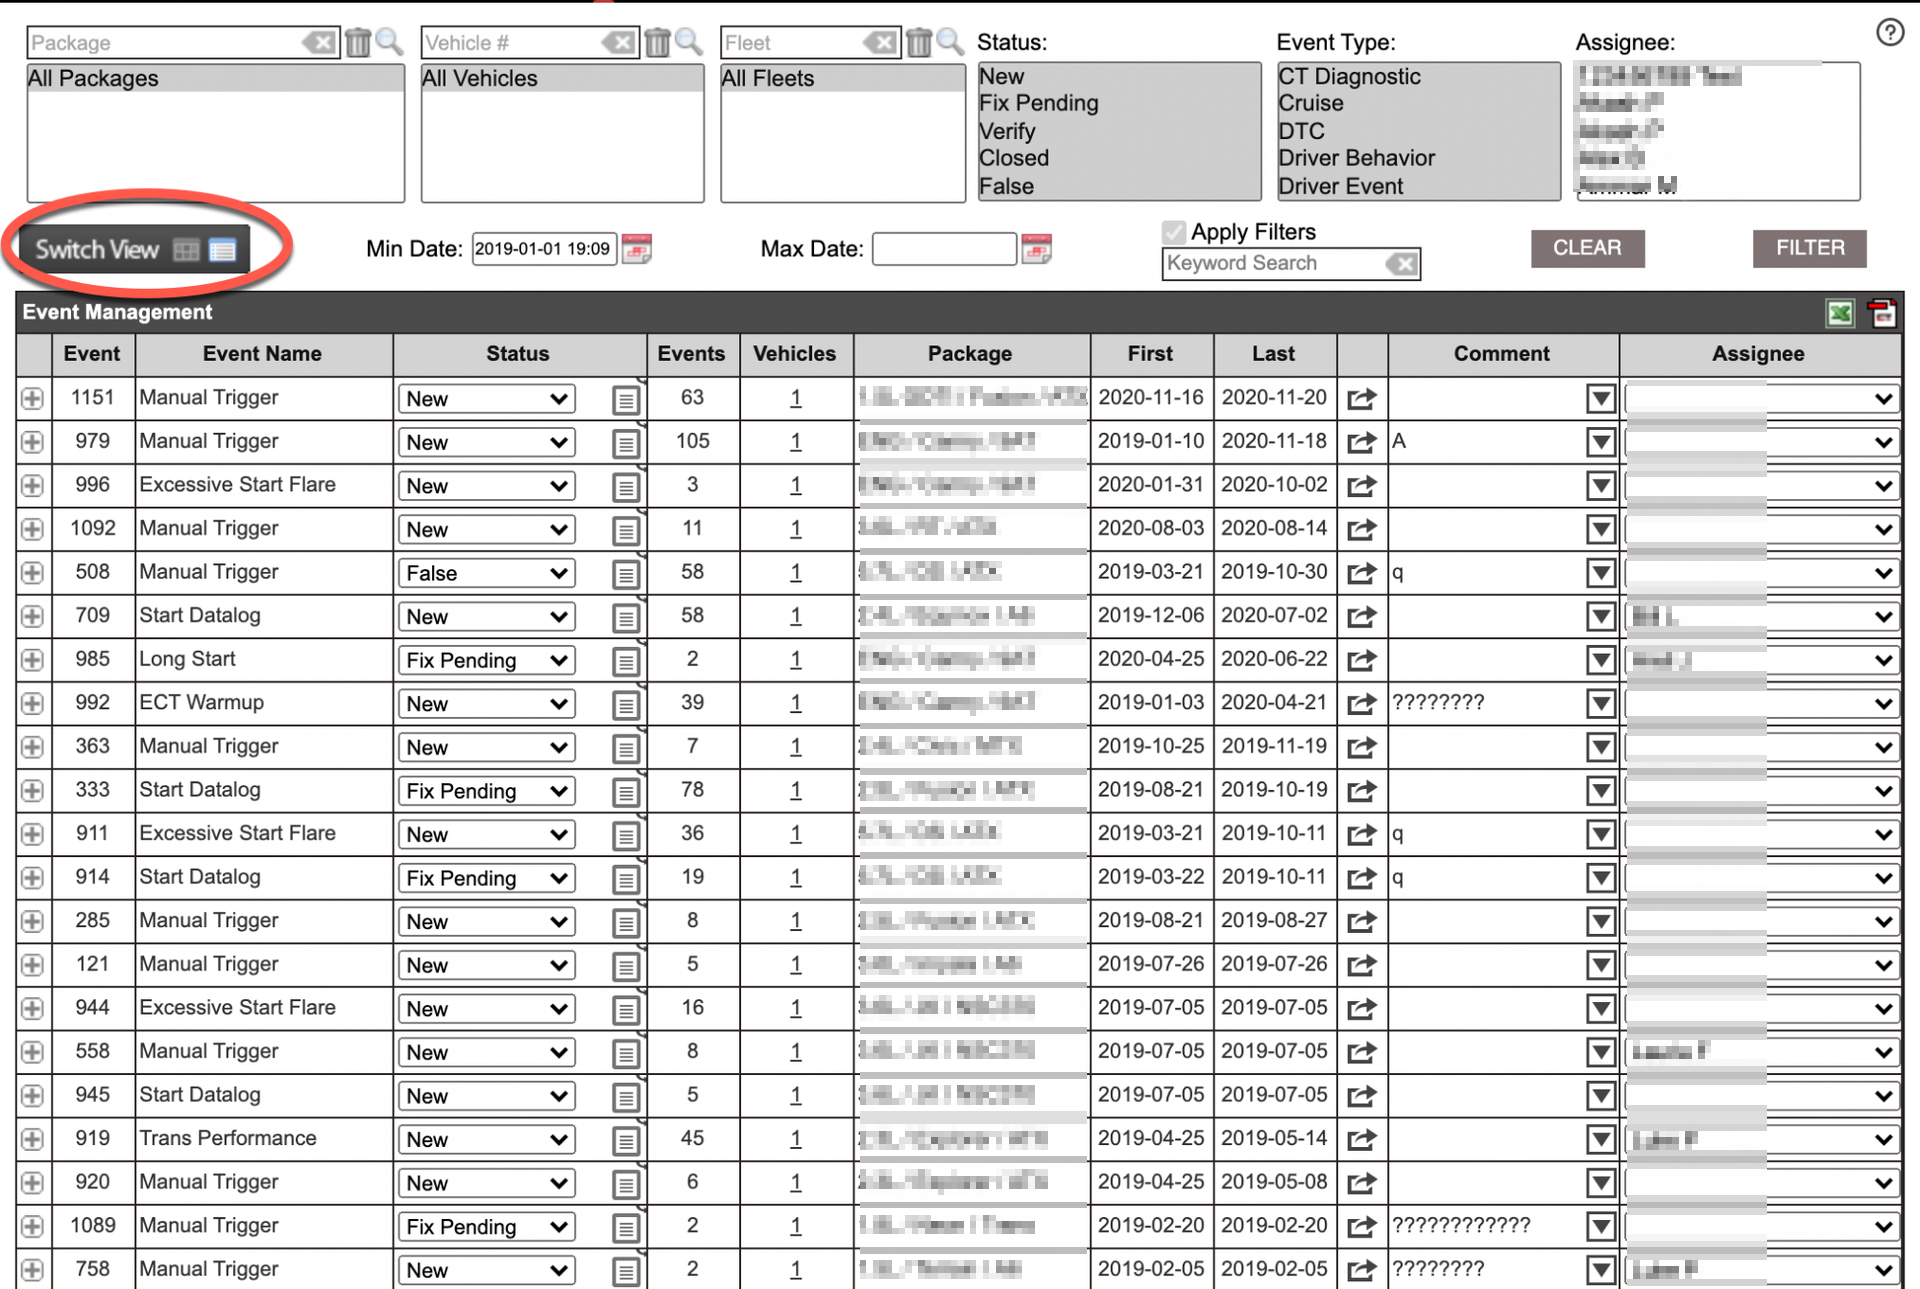
If you click Switch View, you can also see your data as a series of graphs.
Most of the time, however, you will probably be viewing your event data as a table. You will notice Qualifier groups similar types of events together in a single row. If you click the plus sign next to an event row, Qualifier will open a sub-table with data about each of the individual events that are part of the group. Clicking the minus sign will hide the sub-table again.
Managing event data
The Event Management table and Events sub-tables offer a number of different tools that make it easy to investigate and resolve issues. The diagrams below show how to access some of the most commonly used features on the Events page.
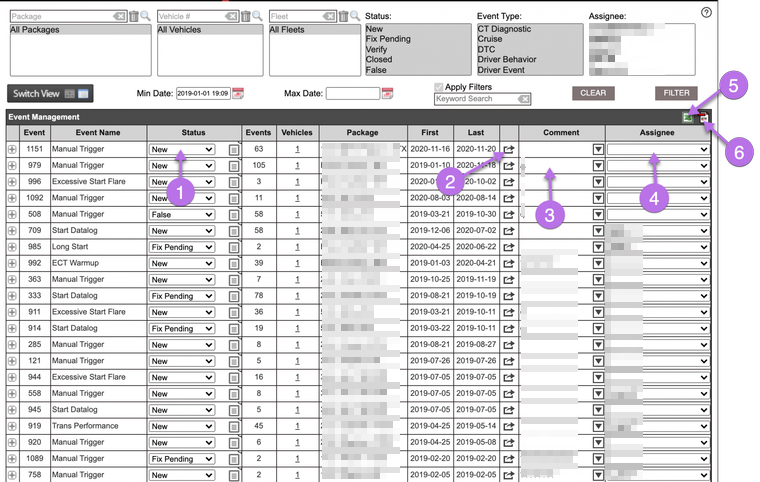
- Update the status of a group of issues.
- Share a group of events with your coworkers.
- Make comments on a group of events.
- Assign someone in your organization to investigate and resolve an issue.
- Download the event data as an Excel file.
- Download the event data as a PDF file.
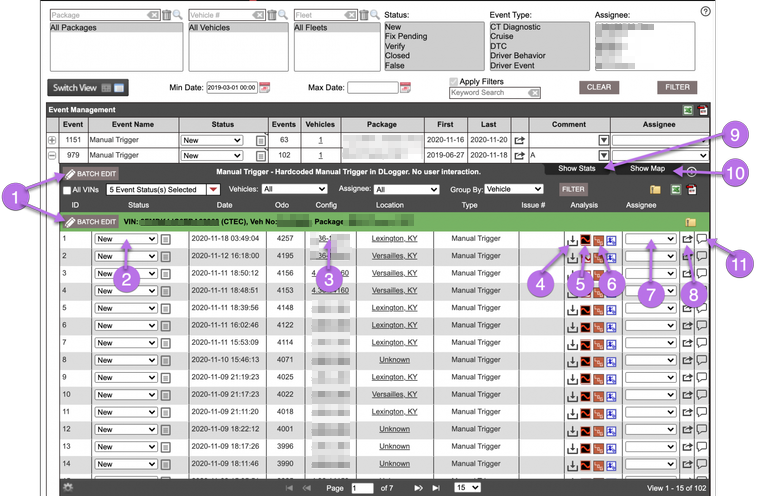
- Batch edit multiple event instances at once.
- Update the status for an individual event instance.
- View configuration details.
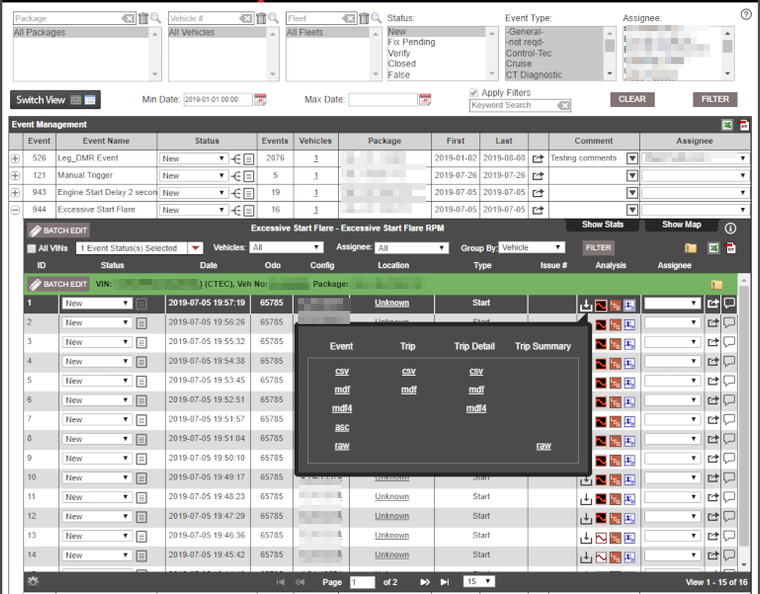
- Download freeze-frame, trip, and trip detail data in a variety of formats (CSV, MDF, MDF, ASC, RAW).
- Open AC-Graph to do further analysis. (To learn more, see Introduction to AC-Graph.)
- View a trip summary log.
- Assign someone in your organization to investigate and resolve an individual issue occurrence.
- Share an individual event occurrence with coworkers.
- Analyze freeze-frame data.
- View events on a map.
- Comment on an individual event occurrence.
Filtering events
Using the selection boxes at the top of the Event page (shown below), you can filter what events are shown. To set the filters, you can type directly in the search box or click the magnifying glass for options.
If global filters are applied, you will not see them in the main filter menu, but you can can view them by clicking the magnifying glass.
You can use keyword search for your event by typing in the box and clicking Filter.
You can also apply the keyword search without any of the filters selected in the boxes above by unchecking the Apply Filters box before you run the filter.
Events page: Issue level view
Issue versus event occurrence
The main view of the Events page lists all the issues within the filters. Note that Qualifier groups all similar event occurrences into one issue.
An event occurrence is equivalent to one event data file. This provides a way to manage all event occurrences at one time if required.
You will see the same issue name multiple times in situations where it occurred across more than one package.
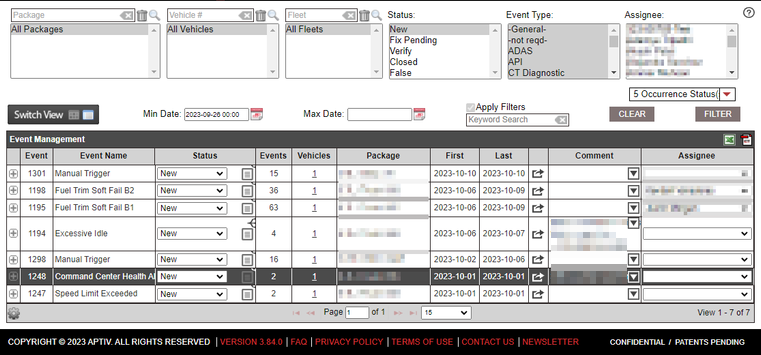
Any changes to the status at the issue level will apply the changes to all the event occurrences within it.
Issue level table
At the Issue level, as shown in the previous section, you will see the total number of event occurrences for the issue and the number of vehicles it occurred across. It gives the date range for the first and most recent (last) occurrence of the issue.
You can share the issue with another Qualifier user by clicking the share icon and it will email that user with the event information and link.
You can add comments using the Comment column to apply them at the issue level. Each event occurrence has a comment associated with it at the Occurrence View.
Lastly, the issue level table provides a field for assigning the issue to a Qualifier user. That person will receive an email when the issue is assigned to them.
Event statistics: Switch View
At the top left of the Issue Level Table, there is a button for Switch View. When you click this button from the table view, it reloads the window with a graphical view of the issue level information.
There are several pareto and line graphs to view event counts overall and by day. You have the option to select how the graphs group the data (for example by Package, Fleet, Vehicle, etc).
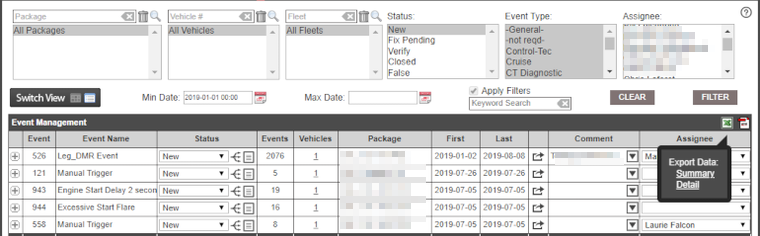
Table export
At the top right of the issue level table, click the Excel icon to export the table information.
This gives you options for Summary and Detail. The Summary link exports the Issue Level Table information to a CSV file. The Detail link exports the Event Occurrence Level Table information to a CSV file.
You can also export the Summary view to a pdf by clicking the PDF icon.
Events page: Occurrence view
Event occurrence level table
When each Issue is expanded it shows all of the event occurrences, grouped by VIN and sorted by date.
There are additional filters that can be applied to the data within that issue:
- The Event Status menu allows you to filter according to the status of individual event occurrences.
- The Vehicles menu provides a way to select a single VIN on which to limit results.
- The Group By menu determines how the events will be sorted or grouped.
Click the Filter button to apply these selections.
The event occurrence table view gives general information for each event. Some of the actions you can take include the following:
- change the status
- select an assignee (if your access level allows), which will notify that person via email.
- share the occurrence with other users via email
- add a comment by clicking the chat icon. (Note that lines through the comment bubble indicates that comments exist for that event.)
The Location column shows the City, State where the event occurred. If you click the contents, it gives you an option to launch a map of either the entire trip (Route) or the event only.
The Analysis column provides links to all the data in the formats shown in the example screenshot below:
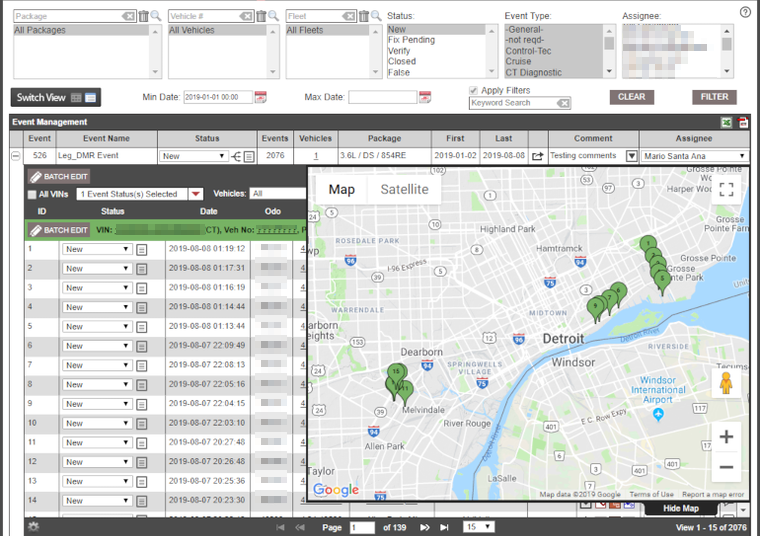
There is also an option to show a map of all the event occurrence locations by clicking the Show Map tab at the upper right of the expanded view.
The color of the pin relates to the color of the grouping header row.
Changing the status of an issue and event occurrence
There are three ways to change the status of an event occurrence:
- Issue level status change
- Single event occurrence status change
- Multiple event occurrences status change
Issue level status change - You can change the status of all event occurrences by using the status drop-down at the issue level.
Use caution when using this method, the status may not apply to all event occurrences. Once the status is changed at this level, all existing occurrences will be set to the status of the issue level.
Single event occurrence status change - You can change the status of a single event occurrence using the status drop-down for the row of the event occurrence.
Multiple event occurrences status change - You can change the status of multiple event occurrences, within one VIN or vehicle, using the button in the VIN header row. Once you have the events filtered down to the ones needing the status change, click the button to view the options menu. Select the Filtered option to apply the status change to only the event occurrences that have been filtered. Select the All option to apply the status change to all occurrences of the issue, ignoring any filters that have been applied.
Event snapshot: "Show Stats"
To provide post-processing analysis, Qualifier stores every parameter from the event at the time the event triggered. You can access this data for analysis across multiple events using the Event Snapshot feature.
From the Event Occurrence view, there is a tab at the upper right that says Show Stats. Click the tab to expand the view.
The feature allows you to pick any two parameters that were captured during the event to plot against each other. It gives a scatter plot graph in the live view, with options to download the image, export the data to a CSV file, or save the plot as a PDF.
Troubleshooting/FAQ
What are events?
Events are datalogs captured due to a trigger (e.g. RPM > 6500). Event data logs typically capture 60 seconds of pre-trigger data followed by 10 seconds of post-trigger data.
What is a manual trigger?
Manual trigger event data is captured when the driver manually presses the physical trigger button in the vehicle.
How do I find an event that happened at a certain time and date?
On any site tab where you can load data you will see both Min Date and Max Date fields, near the top. You can set these to make the site show data from only a certain day. If you know the vehicle from which you would like to find data, you can go to the Vehicles tab, select the VIN, and find the chronological list of data captures in the lower table.
Setting up alerts and event notifications
If you choose, Qualifier can send you an email or text message alerts when specified events occur. It refers to these alerts as Event Notifications.
Alerts are only available through the Legacy Qualifier interface.
Toggle to Legacy Qualifier then follow the steps below to set up alerts:
-
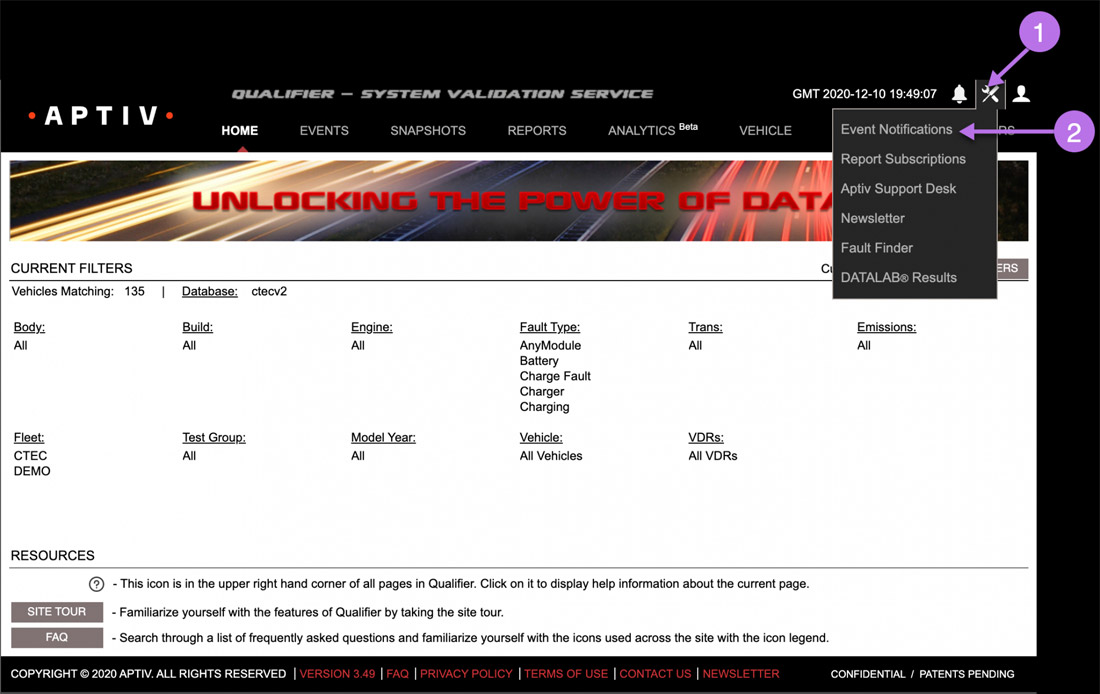
Click the tool icon on the upper right corner of the window to open the Notifications Manager.
-
Click Event Notifications.
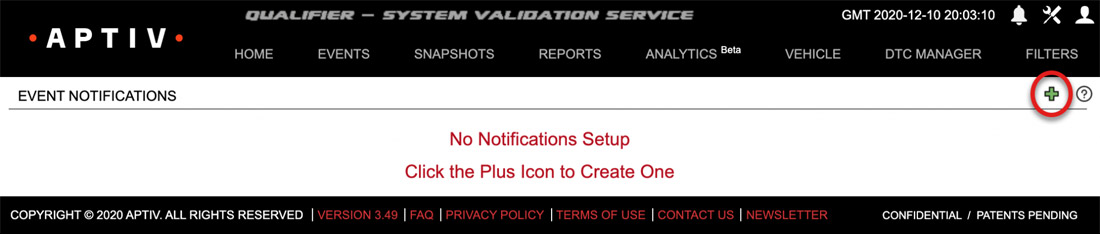
- Click the green plus sign in the upper right corner of the page to open the Notifications Wizard.
- Select the vehicles (or groups of vehicles) that Qualifier should include in the notifications by using the right arrow to select and the left arrow to deselect and click Next to continue.
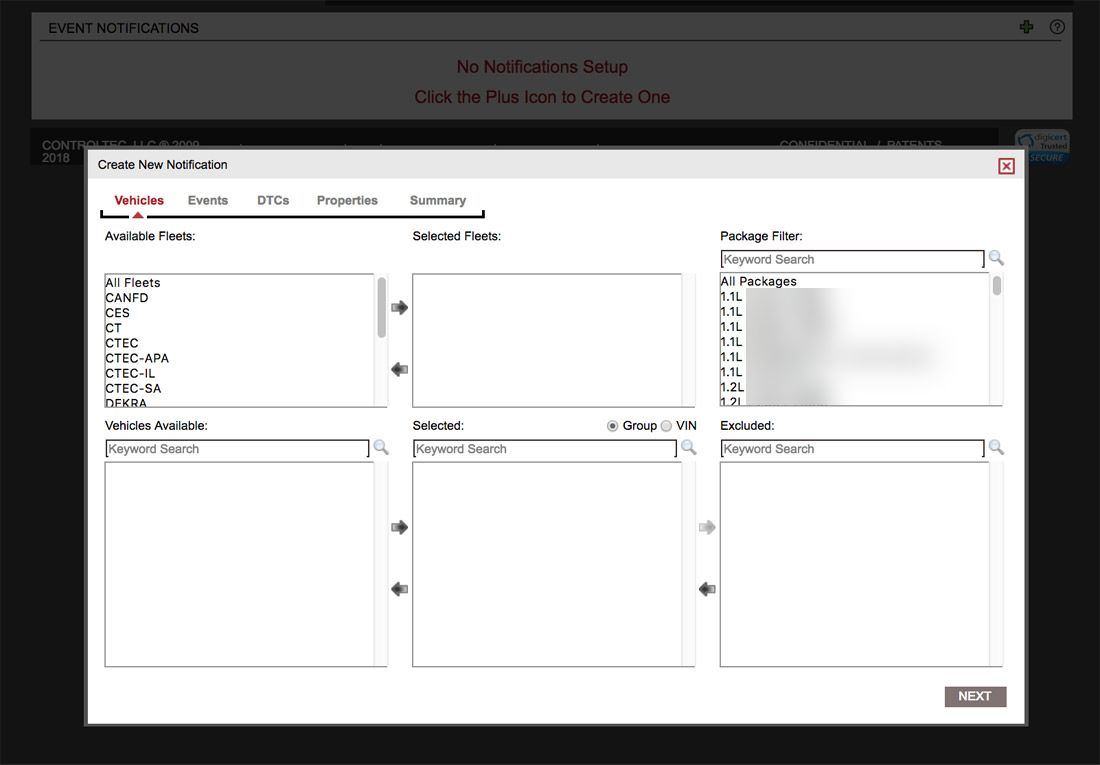
You must select at least one fleet, one package, and one vehicle before moving on to the next step.
- Use the filter boxes to help you locate the event(s) you would like notifications for and click Next to continue.
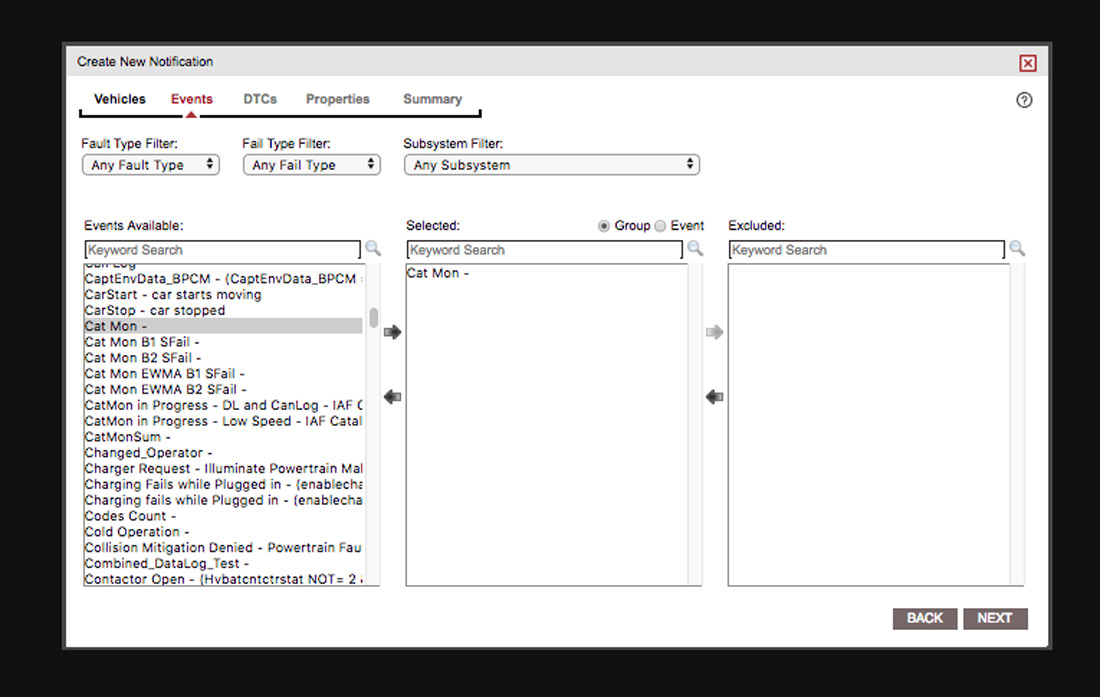
You must select at least one event or DTC (see the next step) to set up a notification.
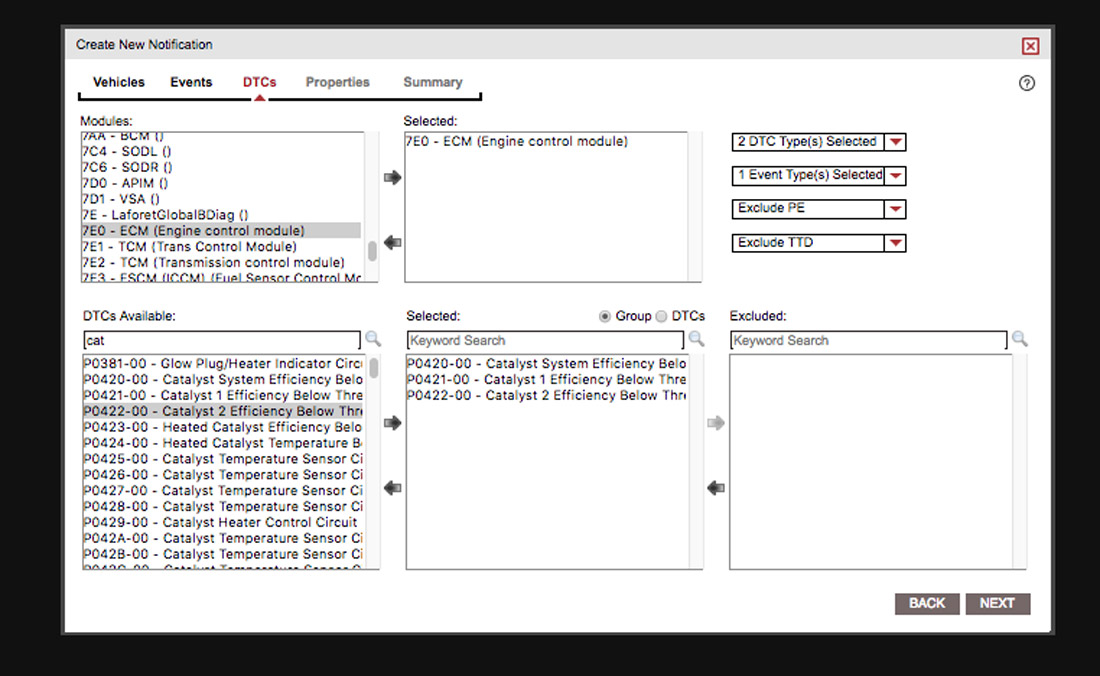
- Use the filter boxes to help you locate the DTC(s) you would like notifications for and click Next to continue.
- Name your notification (required), then determine how frequently you would like to receive alerts, and specify whether or not you would like to receive text alerts as well as email alerts. (If you do opt to receive text alerts, you will need to enter your device information and verify your device as shown below.) Click Next to continue to the final screen.
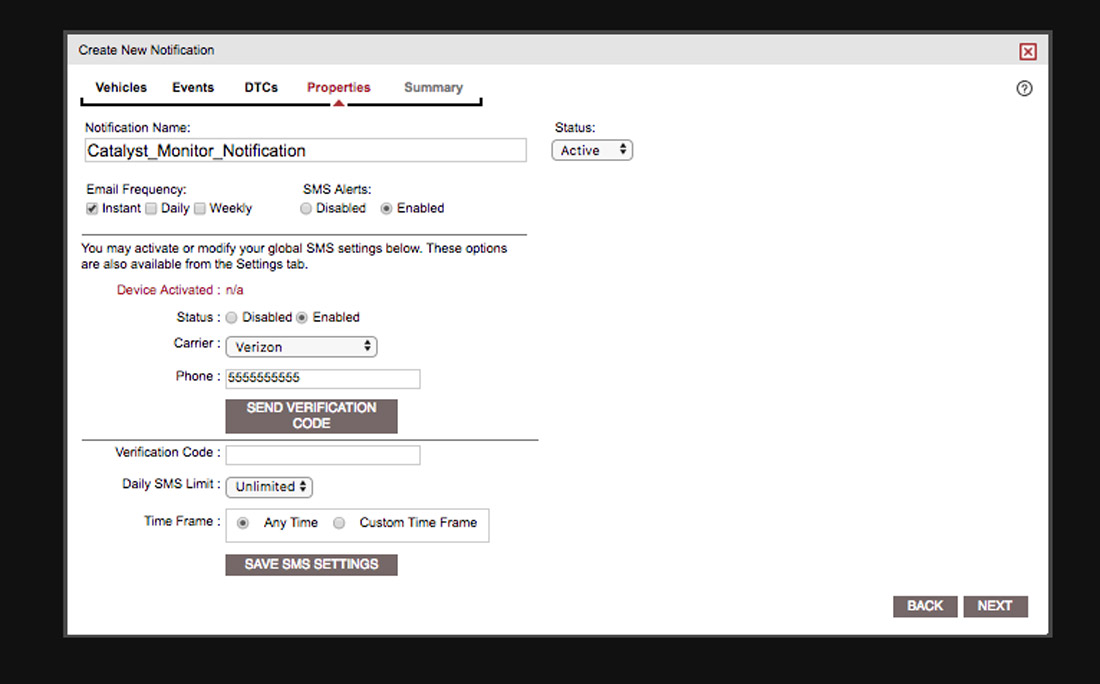
You also have the option to make alerts active or inactive.
- Review your summary. Click Back in the lower right corner of the window to return to the previous sections or click the tabs along the top to return to a specific section.
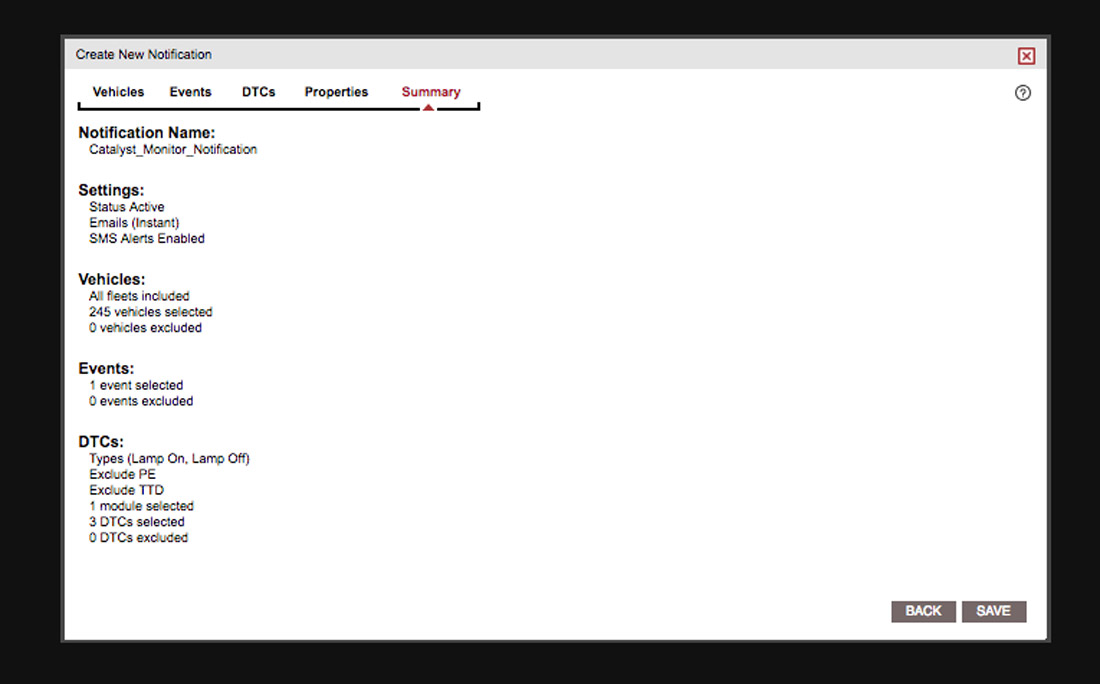
- When ready, click Save to save your notification and return to the Notifications Manager.
Batch editing DTCs and events
Qualifier has the ability to edit multiple DTCs or events at once. You can access this batch edit feature by clicking Batch Edit in the header or opening a subtable on either the DTC or Events pages.
To open a subtable, click the plus sign icon next to the DTC or event that you would like to batch edit.
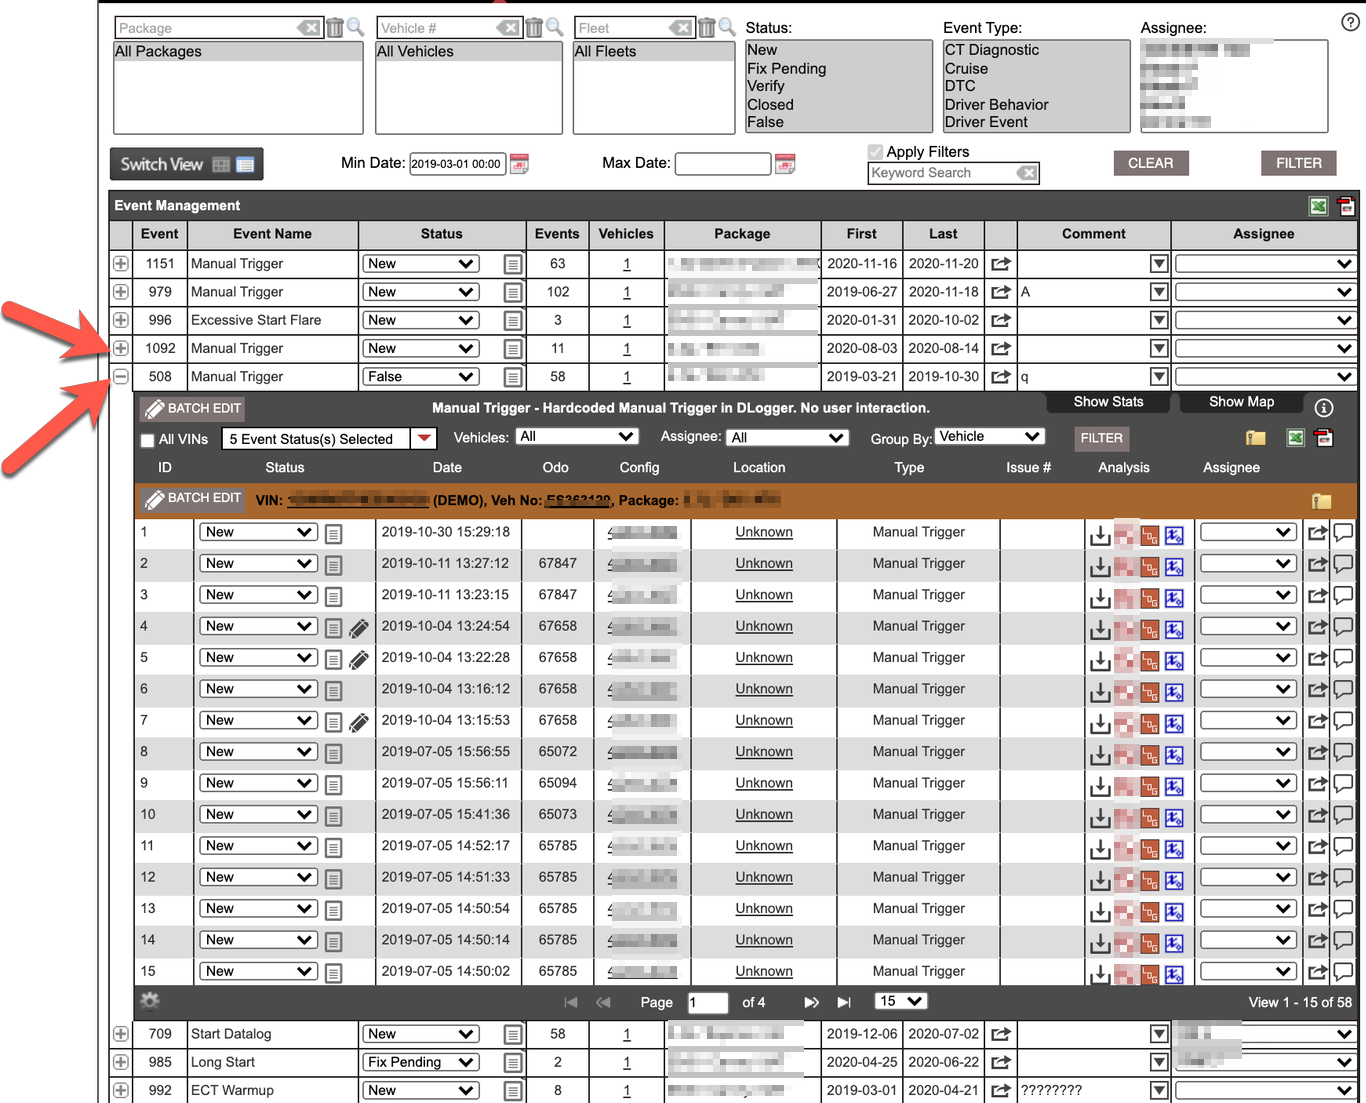
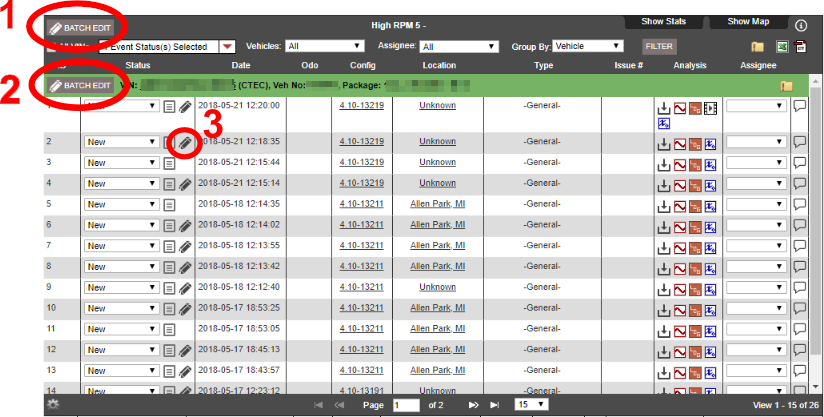
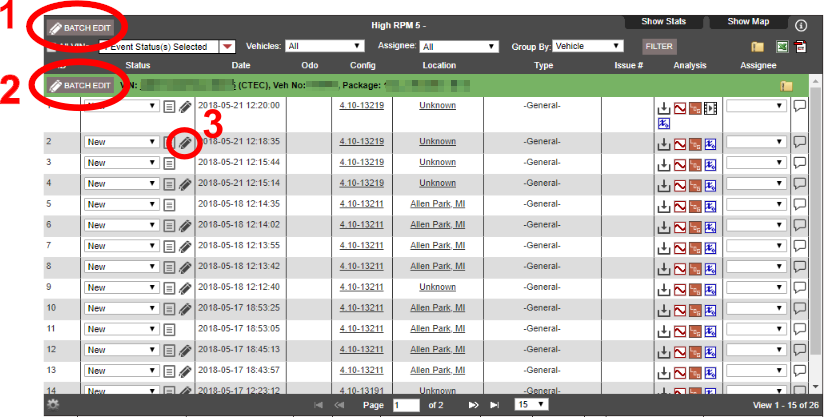
When you open the subtable, you will see at least two places you can click to open the Batch Edit menu. (Look for the double pencil icon.)
For the purposes of this guide, the options shown in the screenshot below are referred to as Batch Edit 1, 2, or 3.
Batch Edit 1
If you want the option of editing all events or DTCs in the current subtable, you can click the top Batch Editbutton (labelled 1 on the screenshot above).
You will then see a Batch Edit menu that looks something like the following screenshot:
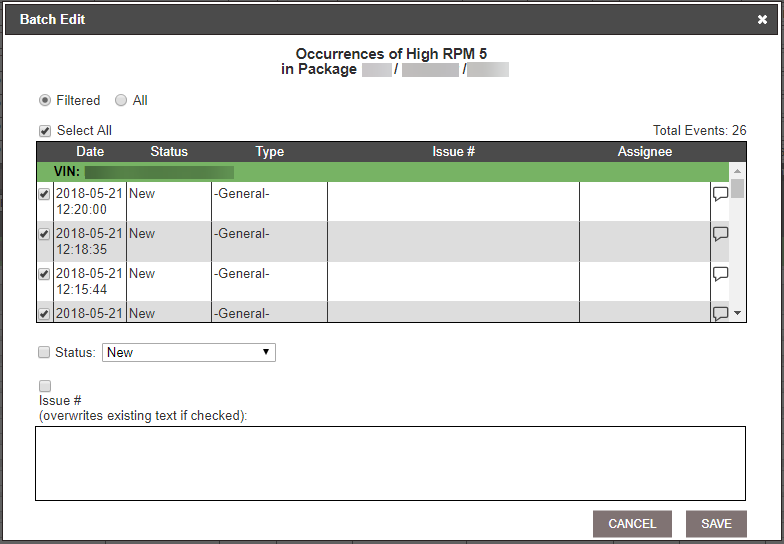
By default, Qualifier will select all of the occurrences. If you only want to edit some of them, uncheck the Select All box and then select the individual occurrences that you would like to edit.
Notice that the heading of the menu shows you exactly which DTCs or events you are editing.
You can also batch edit the status or the issue number for all the occurrences that you have selected. For DTCs, you can also edit the cause.
After you have made the appropriate changes, click Save. (Or click Cancel to exit without saving.)
Qualifier will then display the following pop-up alert to doublecheck that you want to make the batch edits you have selected:
Click Ok to make the batch edits or click Cancel to exit without making the edits.
Batch Edit 2
If you want the option of batch editing all DTC or event occurrences for a single VIN, click the Batch Edit button labelled 2 in the screenshot below:
You will then see a Batch Edit menu that looks something like this:
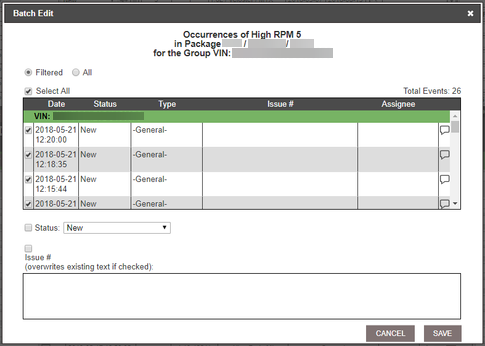
Notice that the heading of the menu shows you exactly which DTCs or events you are editing. By default, Qualifier will select all of the occurrences for the selected VIN. If you only want to edit some of them, uncheck the Select All box and then select the individual occurrences that you would like to edit.
You can batch edit the status or the issue number for all the occurrences that you have selected.
After you have made the appropriate changes, click Save. (Or click Cancel to exit without saving.)
Qualifier will then display a pop-up alert to double-check that you want to make the batch edits you have selected.
Click Ok to make the batch edits or click Cancel. to exit without making the edits.
Batch Edit 3
Sometimes you will see the double pencil icon appear next to an individual DTC or event occurrence in the subtable, for example, like the icon labeled 3 in the screenshot below.
This icon only appears if the vehicle experienced occurrences of additional DTCs or events within a specified time frame. (These might be the same DTC or event or they may be different.)
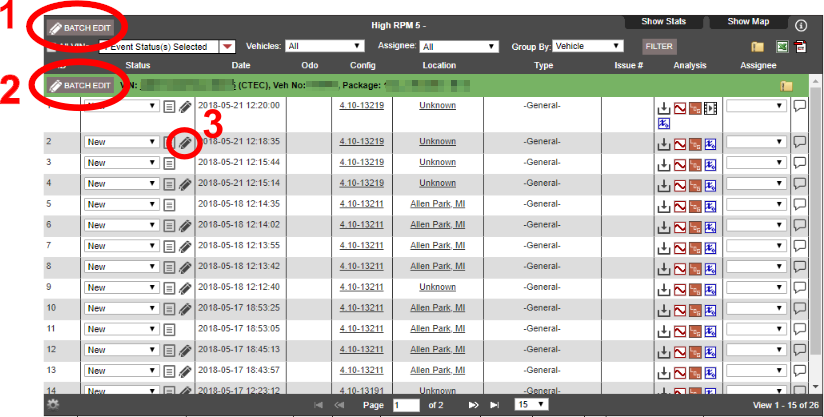
By default, Qualifier will display the double pencil icon when there are other occurrences within 20 seconds of the occurrence listed.
20 seconds is the default, though your organization may set custom parameters.
Click the double pencil icon to batch edit all the occurrences of a DTC or event that occurred within the specified time frame.
You will then see a Batch Edit menu that looks something like this:
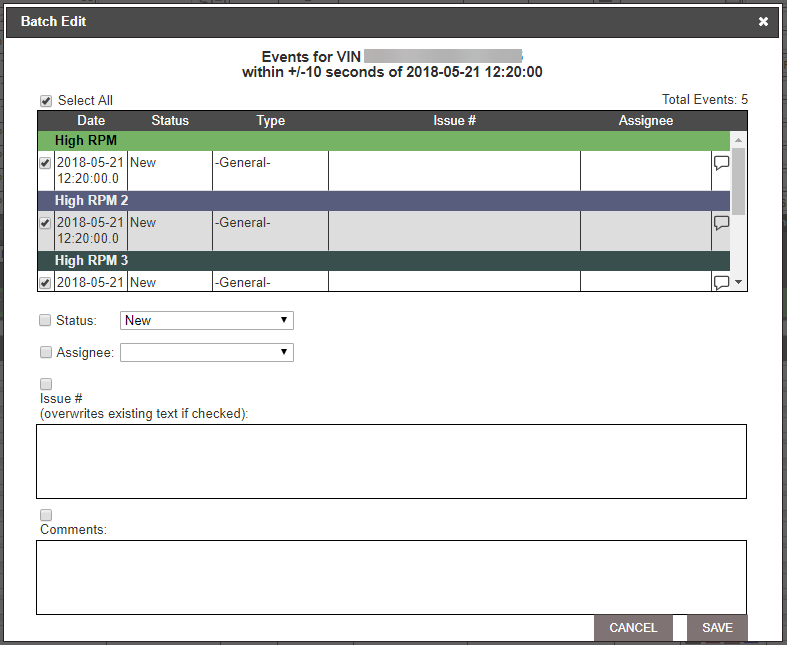
Notice that the heading of the menu shows you exactly which DTCs or events you are editing and for which VINs.
By default, Qualifier will select all of the occurrences within the specified time frame. If you only want to edit some of them, uncheck the Select All box and then select the individual occurrences that you would like to edit.
You can batch edit the status or the issue number for all the occurrences that you have selected.
After you have made the appropriate changes, click Save. (Or click Cancel to exit without saving.)
Qualifier will then display a pop-up alert to double-check that you want to make the batch edits you have selected.
Click Ok to make the batch edits or click Cancel to exit without making the edits.