DTC Manager (legacy)
This page documents the legacy Qualifier interface. Unless a task is only available there, the User Guide covers the interface you see when you sign in.
To reach the legacy interface, set the Next-Gen UI toggle in the top bar to Off.
The legacy DTC Manager collects the diagnostic trouble code (DTC) history for your vehicles in one view.
Aptiv vehicle data recorders (VDRs) capture a DTC event when they detect a new code. The resulting event file, also called a datalog, typically contains 60 seconds before the trigger and 10 seconds after it. Your organization's capture window may differ.
DTC Manager also collects snapshots for stored and cleared codes.
How-to guides
The following how-to guides relate to activities you can perform within the DTC Manager page:
Accessing the DTC Manager page
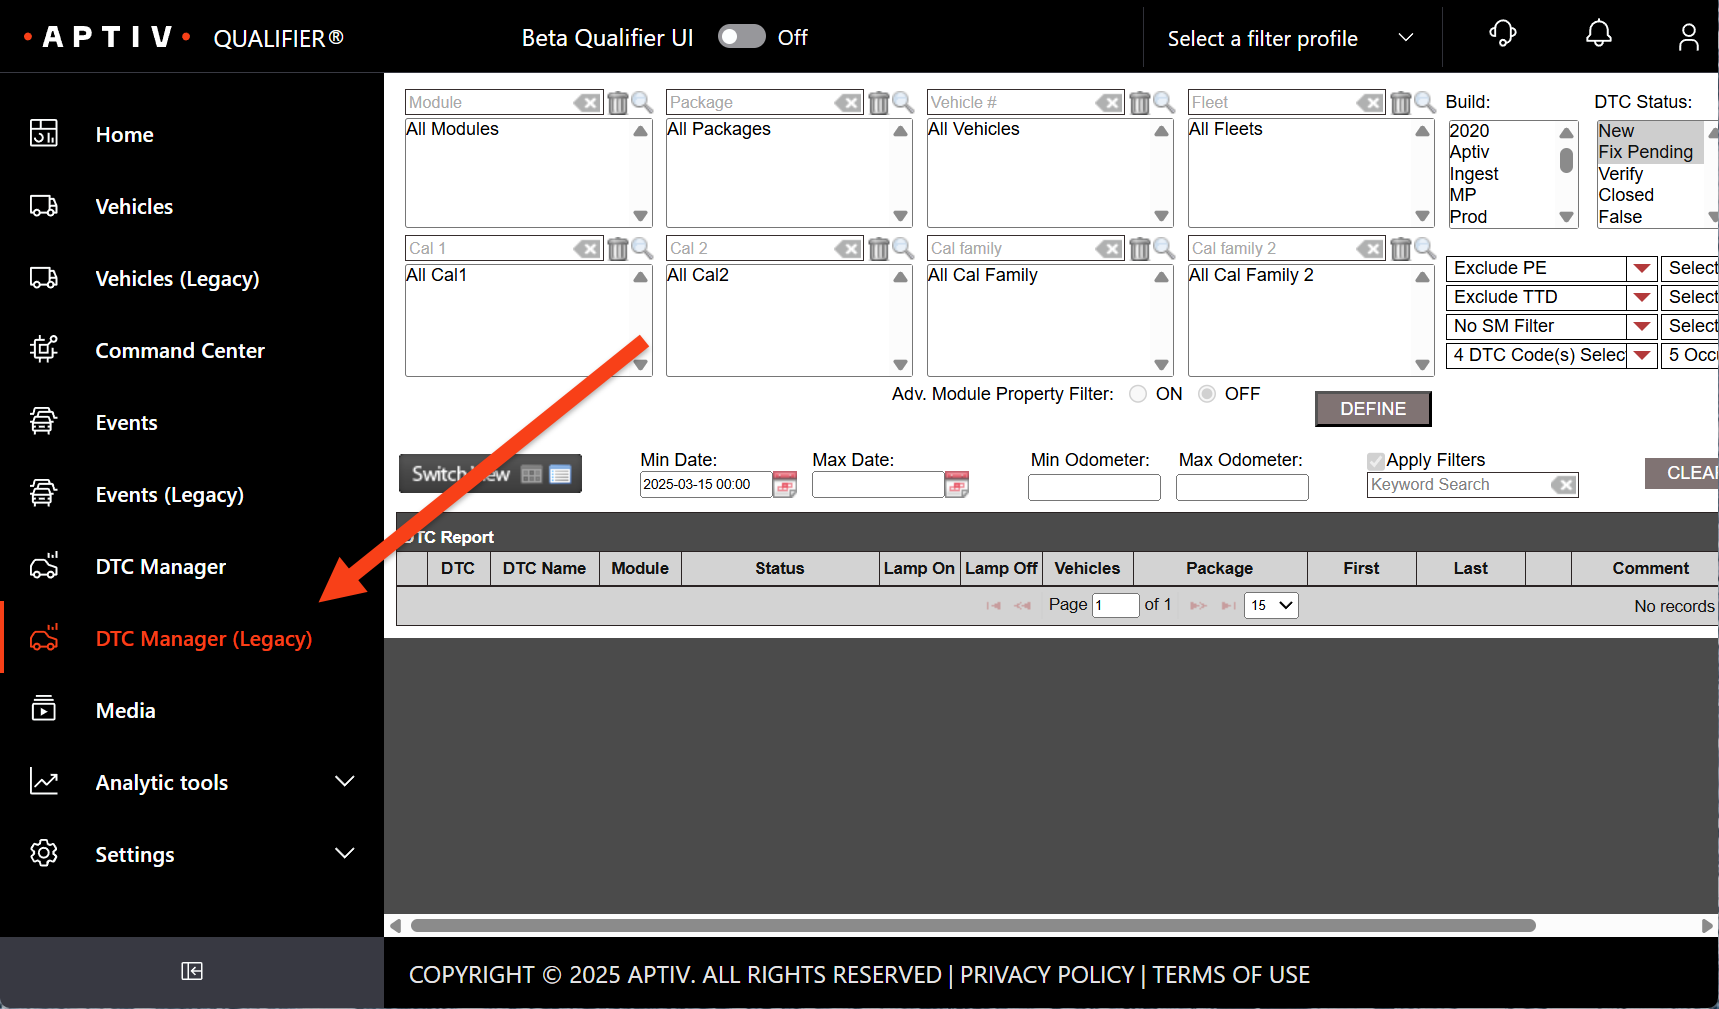
Open DTC Manager from the primary left navigation.
Clicking DTC Manager opens the Legacy Qualifier DTC Manager page within the Next-Gen Qualifier interface.
Understanding the UI
On this page, data is organized by DTC. This is where you should navigate to if you are interested in viewing a specific DTC across multiple vehicles.
Filtering DTCs
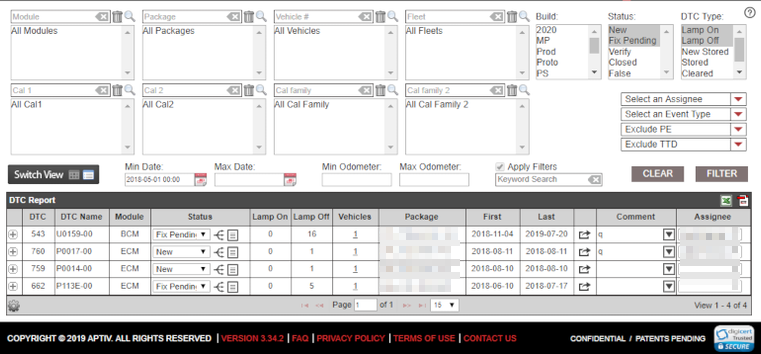
When the DTC Manager page is selected, no data is displayed until the Filters have been configured. Using the selection boxes at the top of the page (shown in the screenshot below), you can filter what data is displayed.
The following actions can be performed in these boxes:
- Left mouse click selects one of the options displayed
- Ctrl + left click adds or removes additional selections.
- Mouse over the DTC Type, PE, and TTD filter boxes and pop ups appear to provide more information.
You can use a keyword search for the DTC by entering your query in the search box and clicking Filter. You can also apply the keyword search without any of the filters selected in the boxes above by unchecking the Apply Filters box before you run the filter.
DTC Manager page: issue level view
Issue versus event occurrence
The main view of the DTC Manager page lists all the DTCs, grouped by number, within the filters. This is the issue level. Qualifier groups all similar DTC event occurrences into one Issue.
A DTC event occurrence is equivalent to one DTC event data file. This provides a way to manage all DTC event occurrences at one time if required. You will see the same DTC number multiple times in the case that it occurred across more than one package.
It’s important to note that making any changes to the status at the issue level will apply the changes to all the DTC event occurrences within it.
Issue Level Table
At the issue level, as shown in the screenshot in the previous section, you will see the total number of DTC event occurrences for the DTC number, and the number of vehicles it occurred across. It gives the date range for the first and most recent (last) occurrence of the DTC.
You can share the issue with another Qualifier user by clicking the share icon and it will email that user with the event information and link.
Comments can be added using the Comment column, which will apply the comment at the issue level. Lastly, it provides a field for assigning the issue to a Qualifier user.
The user will get notified via email when the issue is assigned to them.
DTC statistics: Switch View
At the top left of the Issue Level Table, there is a button for Switch View. When you click this button from the table view, it reloads the window with a graphical view of the issue level information.
There are several pareto and line graphs to view DTC counts overall and by day. You have the option to select how the graphs group the data (for example by Package, Fleet, Vehicle, etc.)
Table Export
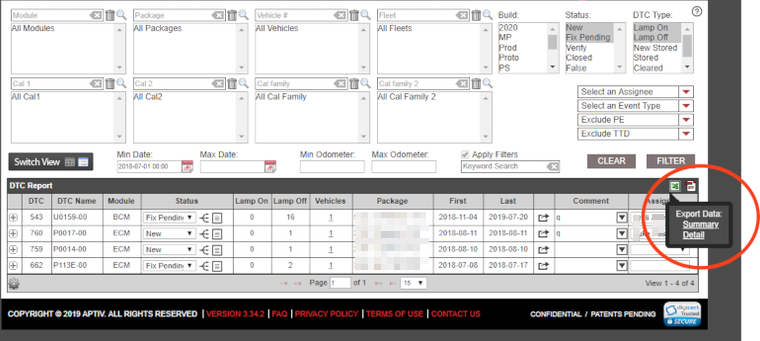
At the top right of the issue level table, click the Excel icon to export the table information.
This gives you options for Summary and Detail. The Summary link exports the Issue Level Table information to a CSV file. The Detail link exports the Event Occurrence Level Table information to a CSV file.
You can also export the Summary view to a pdf by clicking the PDF icon.
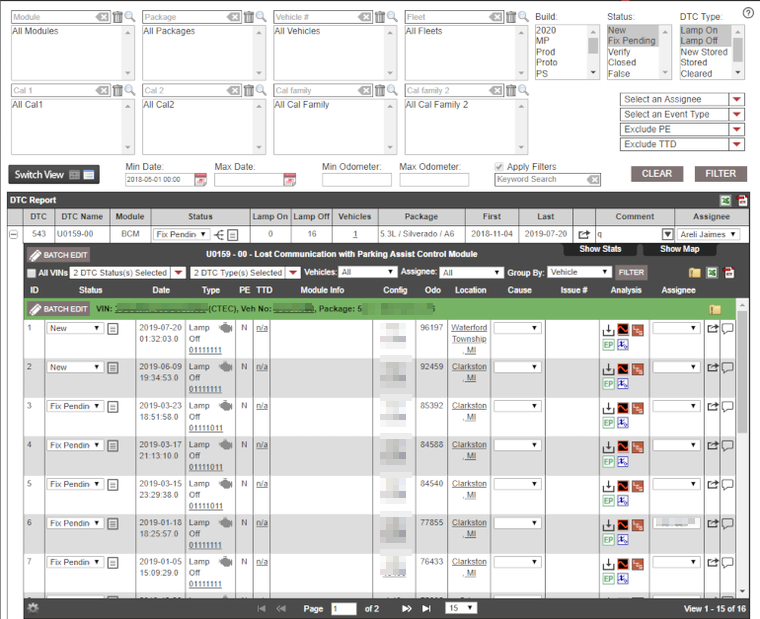
DTC Manager Page: Occurrence View
DTC event occurrence level table
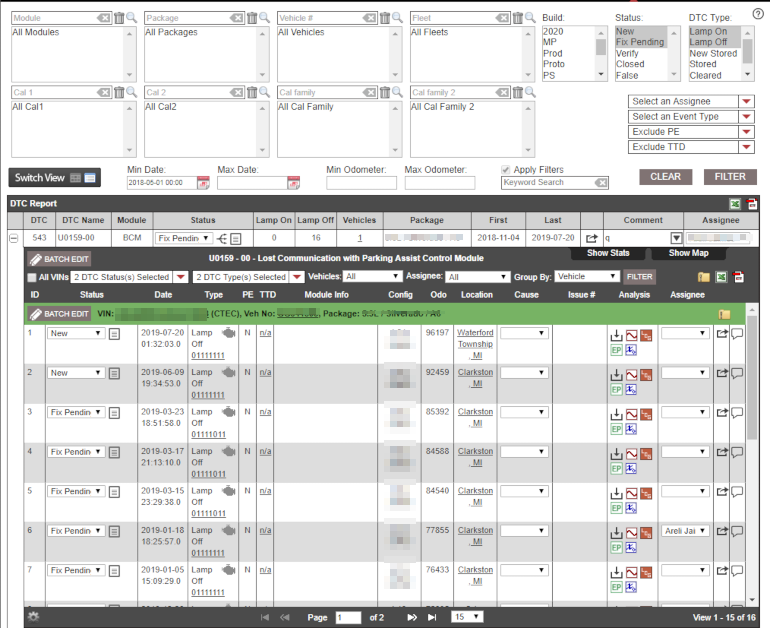
When each Issue is expanded it shows all of the event occurrences, grouped by VIN and sorted by date.
There are additional filters that can be applied to the data within that issue:
- The DTC Status and DTC Type drop-downs allow you to filter according to these selections for the occurrences within that issue.
- The Vehicles drop-down allows you to select a single VIN to filter occurrences by. You can also filter by whom the issue is assigned.
- The Group By option allows you to group the DTCs within that issue by something other than VIN.
Click the Filter button to apply these selections.
The DTC event table view gives general information for each event. Some of the actions you can take include the following:
- Change the status
- Select a cause
- Provide an Issue # to coincide with internal tracking
- Assign the specific occurrence to a user
- Share the issue with other users via email
- Add/view comments
If you click the status bit register in the Type column, it shows a description for each bit and highlights which ones were set.
Column explanations
The PE column indicates whether the DTC was preexisting. Preexisting means that the DTC was already existing when the VDR queried the module for DTCs the first time.
The TTD (Test Tool Detected) column indicates whether the DTC was recorded during the first read after a test tool was on the network. These are flagged in this manner as they may have been induced by the test tool. If your access allows, you can click the contents of this cell and remove or add the TTD flag for any DTC.
The Location column shows the city and state where the DTC occurred. If you click the contents, it gives you an option to launch a map of either the entire trip (Route) or the event only.
The Analysis column provides links to all the data as follows:
| Icon | Description |
|---|---|
| Opens a menu that provides download links for all DTC, Trip, and Trip Detail files. | |
| Graphs the Trip data in Qualifier's integrated graphing utility AC-Graph. | |
| Launches a browser window with the Trip Summary Log. | |
| Downloads a TXT file of the Environmental Parameters or Freeze Frame data. | |
| Shows the trigger logic and values for preconfigured parameters at the time the event triggered. |
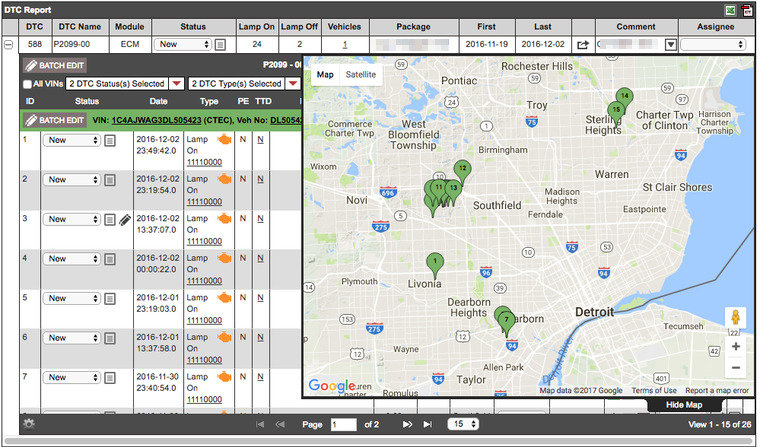
The DTC Event Occurrence table view also shows a map of all the DTC occurrences by clicking the Show Map tab at the upper right of the expanded view.
The color of the pin relates to the color of the grouping header row.
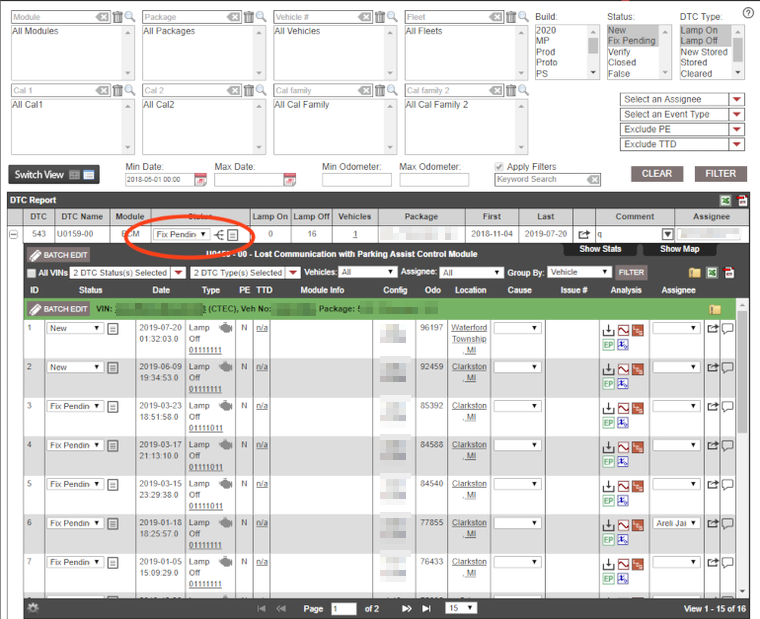
Changing the status of an issue and DTC event occurrence
There are multiple ways to change the status of a DTC, which is outlined below:
Issue Level Status Change - You can change the status of an issue and all DTC event occurrences within that issue by using the Status drop down at the Issue level. Use caution when using this method, as the status may not apply to all event occurrences. Once the status is changed at this level, all existing occurrences will be set to the status of the issue level.
Single DTC Event Occurrence Status Change - You can change the status of a single DTC event occurrence using the Status drop down for the row of the DTC event occurrence.
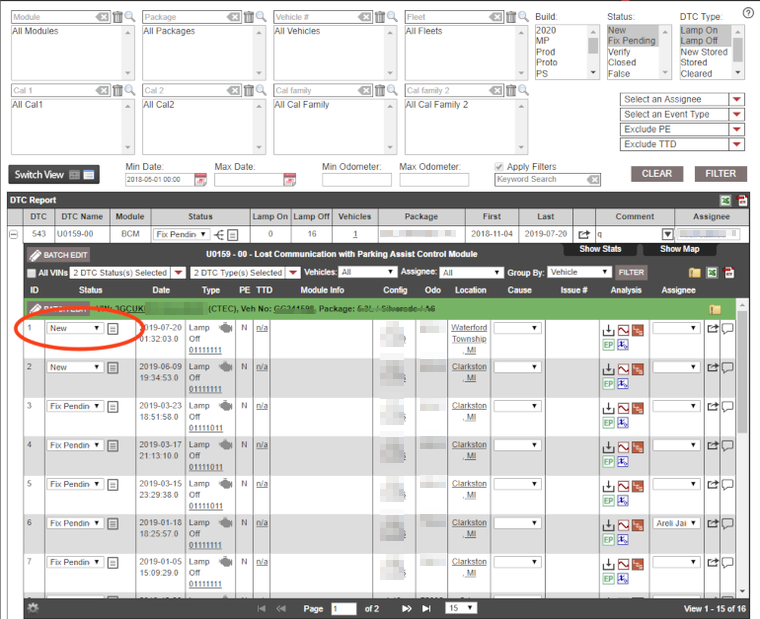
Batch edit DTC occurrences
DTC Manager page now provides a method to batch edit multiple DTCs including the Status, Cause, Assignee, Issue #, and Comments.
To learn more, see How to Batch Edit DTCs and Events.
DTC Snapshot: Show Stats
To provide post processing analysis, Qualifier stores every parameter, including the Freeze Frame data, from the DTC event at the time the event triggered. You can access this data for analysis across multiple events using the DTC Snapshot feature.
From the DTC Event Occurrence view, there is a tab at the upper right that says Show Stats. Click the tab to expand the view.
The feature allows you to pick any two parameters that were captured during the event to plot against each other. It gives a scatter plot graph in the live view, with options to download the image, export the data to a CSV file, or save the plot and statistics table into a PDF.
The advanced module property filter
On the DTC Manager page there is a filter called the Advanced Module Property filter.
This feature allows you to filter DTCs based on the unique characteristics of the control module that set the DTC.
For example, you can filter for DTCs set by ECMs with a particular part number or ECMs made by a particular manufacturer.
To use this filter, follow the steps below:
- Navigate to the DTC Manager page using the primary left navigation menu.
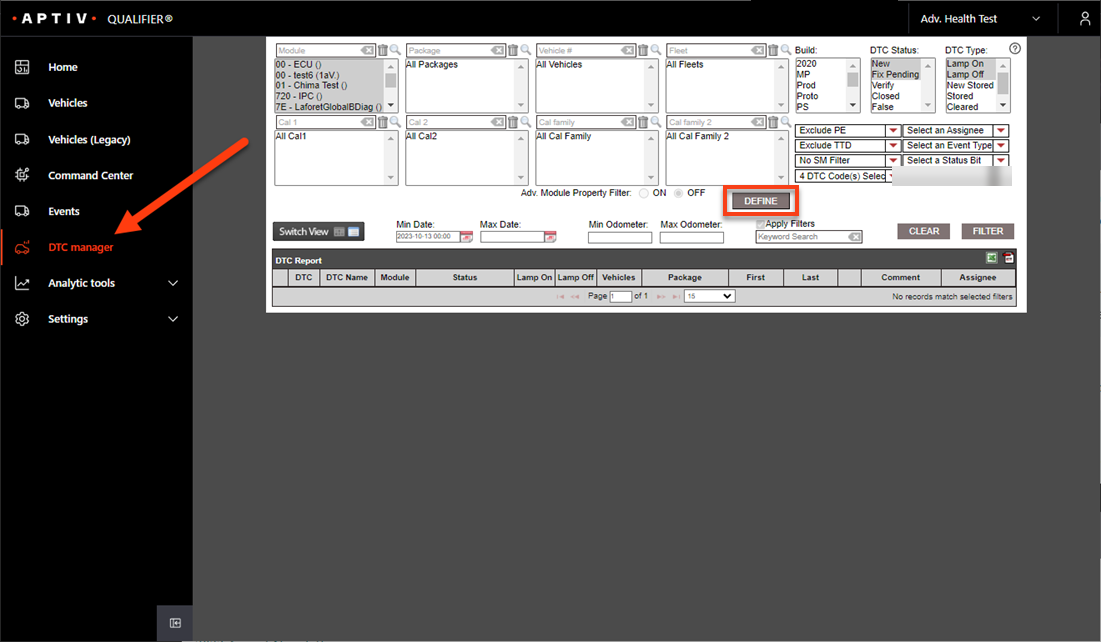
- Click Define. This will open the Define Module Filters dialog as shown in the following screenshot:
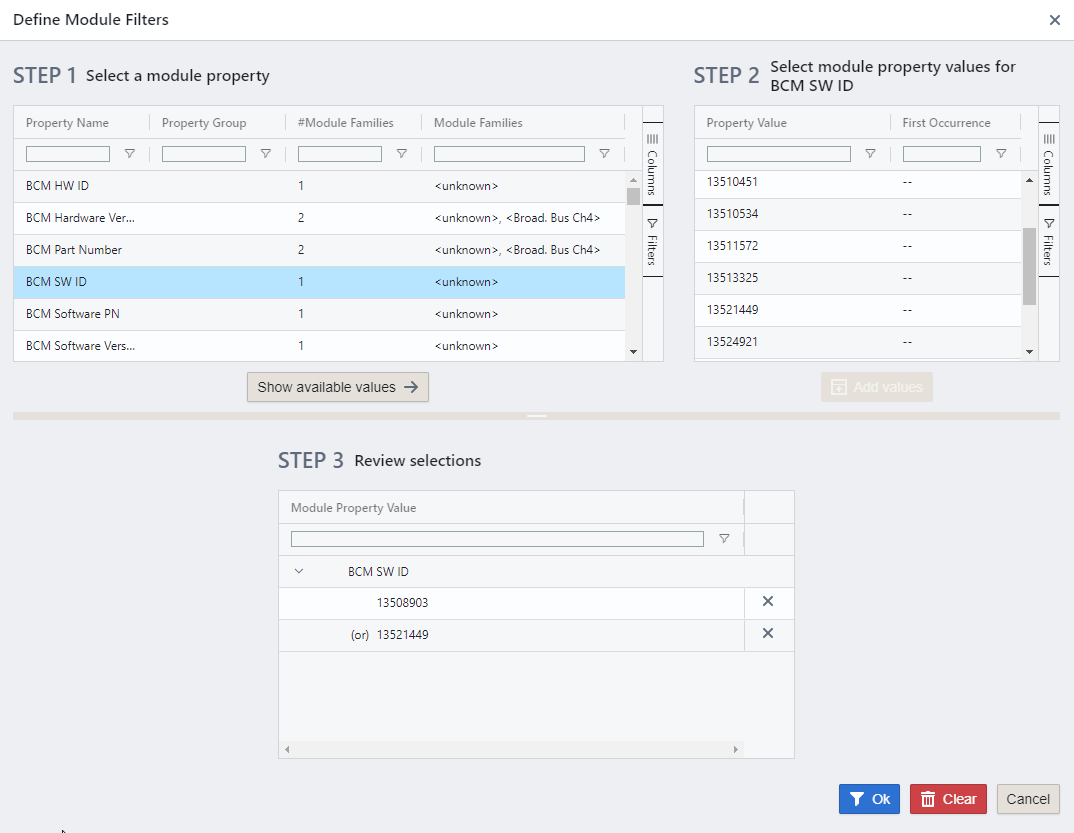
-
Select a property that you would like to include in your filter.
-
Click Show available values.
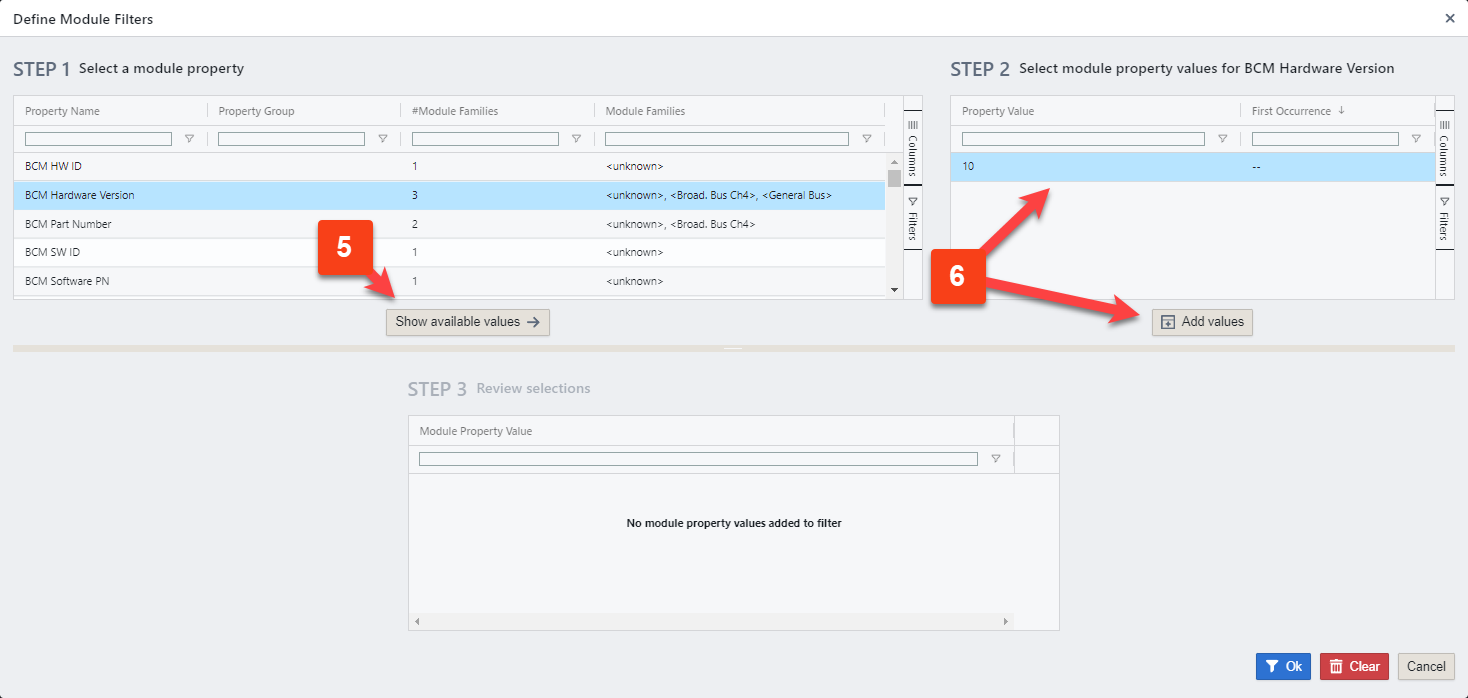
- Select the value(s) that you want to filter for, then click Add values.
You may repeat steps 3–5 as often as you like. As you add filter criteria, they will appear in the Step 6 box that allows you to review your selections.
-
When you are finished selecting criteria, click Ok.
-
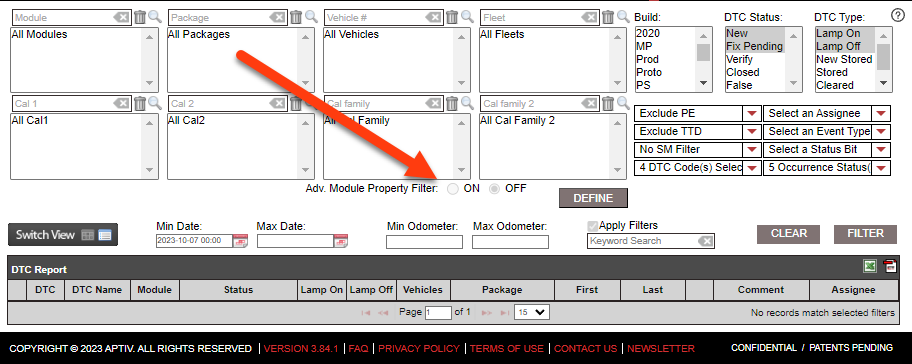
Back on the DTC Manager page, click the On radio buttons next to Adv. Module Property Filter to turn your module property filters on, as shown in the following screenshot: