Account settings and tools (legacy)
This page documents the legacy Qualifier interface. Unless a task is only available there, the User Guide covers the interface you see when you sign in.
To reach the legacy interface, set the Next-Gen UI toggle in the top bar to Off.
Legacy Qualifier provides several routes to product information and assistance. This page covers the tools available from the legacy account and help menus:
- Aptiv Support Desk: Submit a question or request directly to Aptiv's ticketing system. Availability depends on your organization's configuration.
Legacy Qualifier Help
- Built-in Help: Open contextual instructions from icons throughout the application.
- Site Tour: Review the main areas of Qualifier from the Home page.
- FAQ: Open answers to common questions and explanations of interface icons.
Aptiv Support Desk
The Aptiv Support Desk is available from both the standard and legacy interfaces.
For detailed information on creating and editing Support Desk tickets, see How to Submit a Support Desk Ticket in Qualifier.
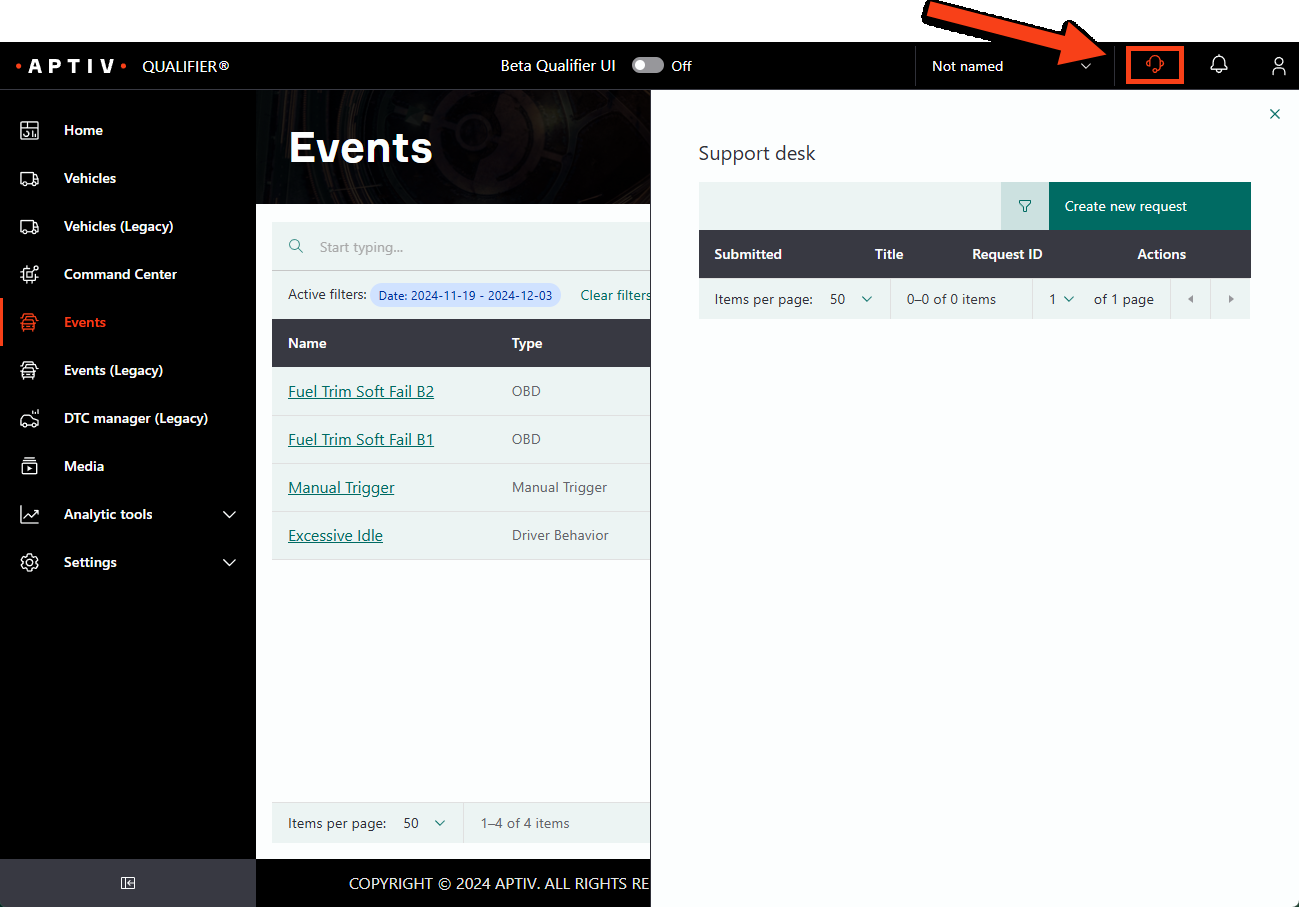
In Next-Gen Qualifier, click the headset icon (:headset:) in the upper right corner of your screen, as shown in the example below:
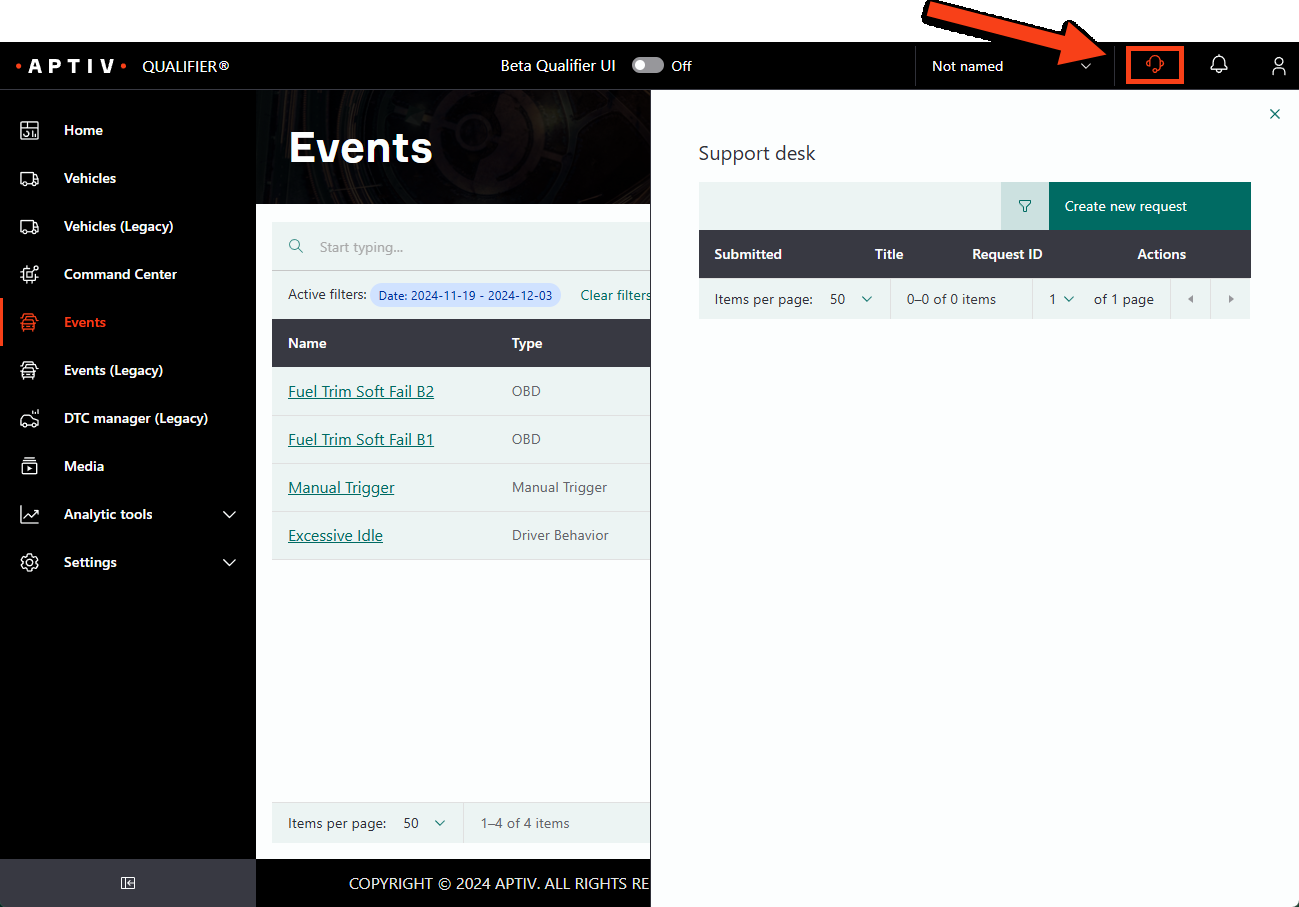
From there you can perform the following actions:
- View a list of active tickets in the table.
- Click Create New Request to initiate a new support ticket.
- Click View Request on an active request to make changes or cancel the ticket.
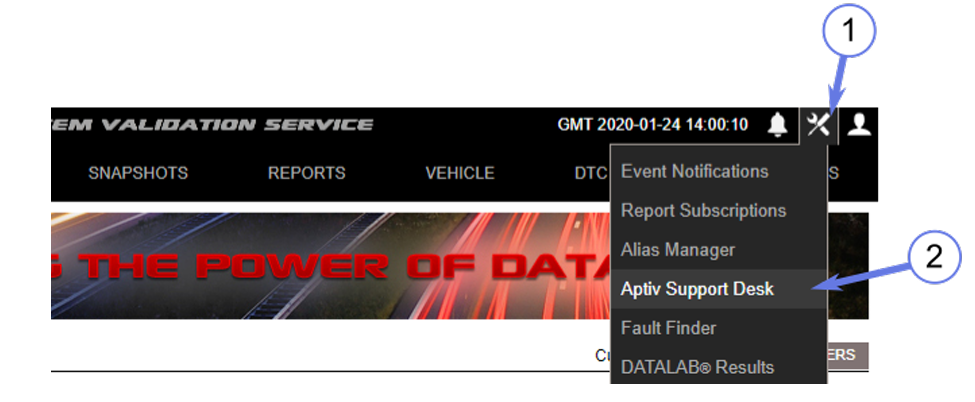
In Legacy Qualifier, click the workbench icon (:workbench-icon:) in the upper right corner of your screen, then click Aptiv Support Desk, as shown in the example below:
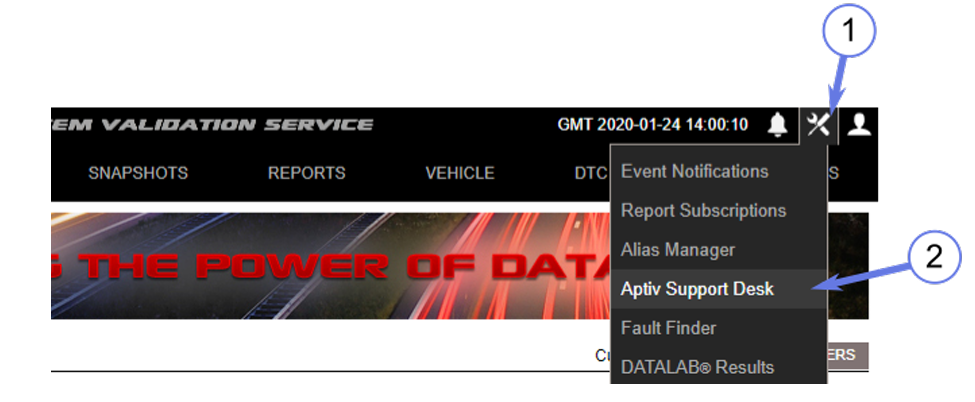
From there, you can perform the same actions as within Next-Gen Qualifier detailed above.
You will see the same set of tickets in both Legacy and Next-Gen Qualifier.
Legacy Qualifier Help Features
Site Tour
In case you forget what you can do with the different Legacy Qualifier pages, there is a built-in site tour to help refresh your memory.
To access this feature, click the Site Tour button in the lower left corner of the Home page.
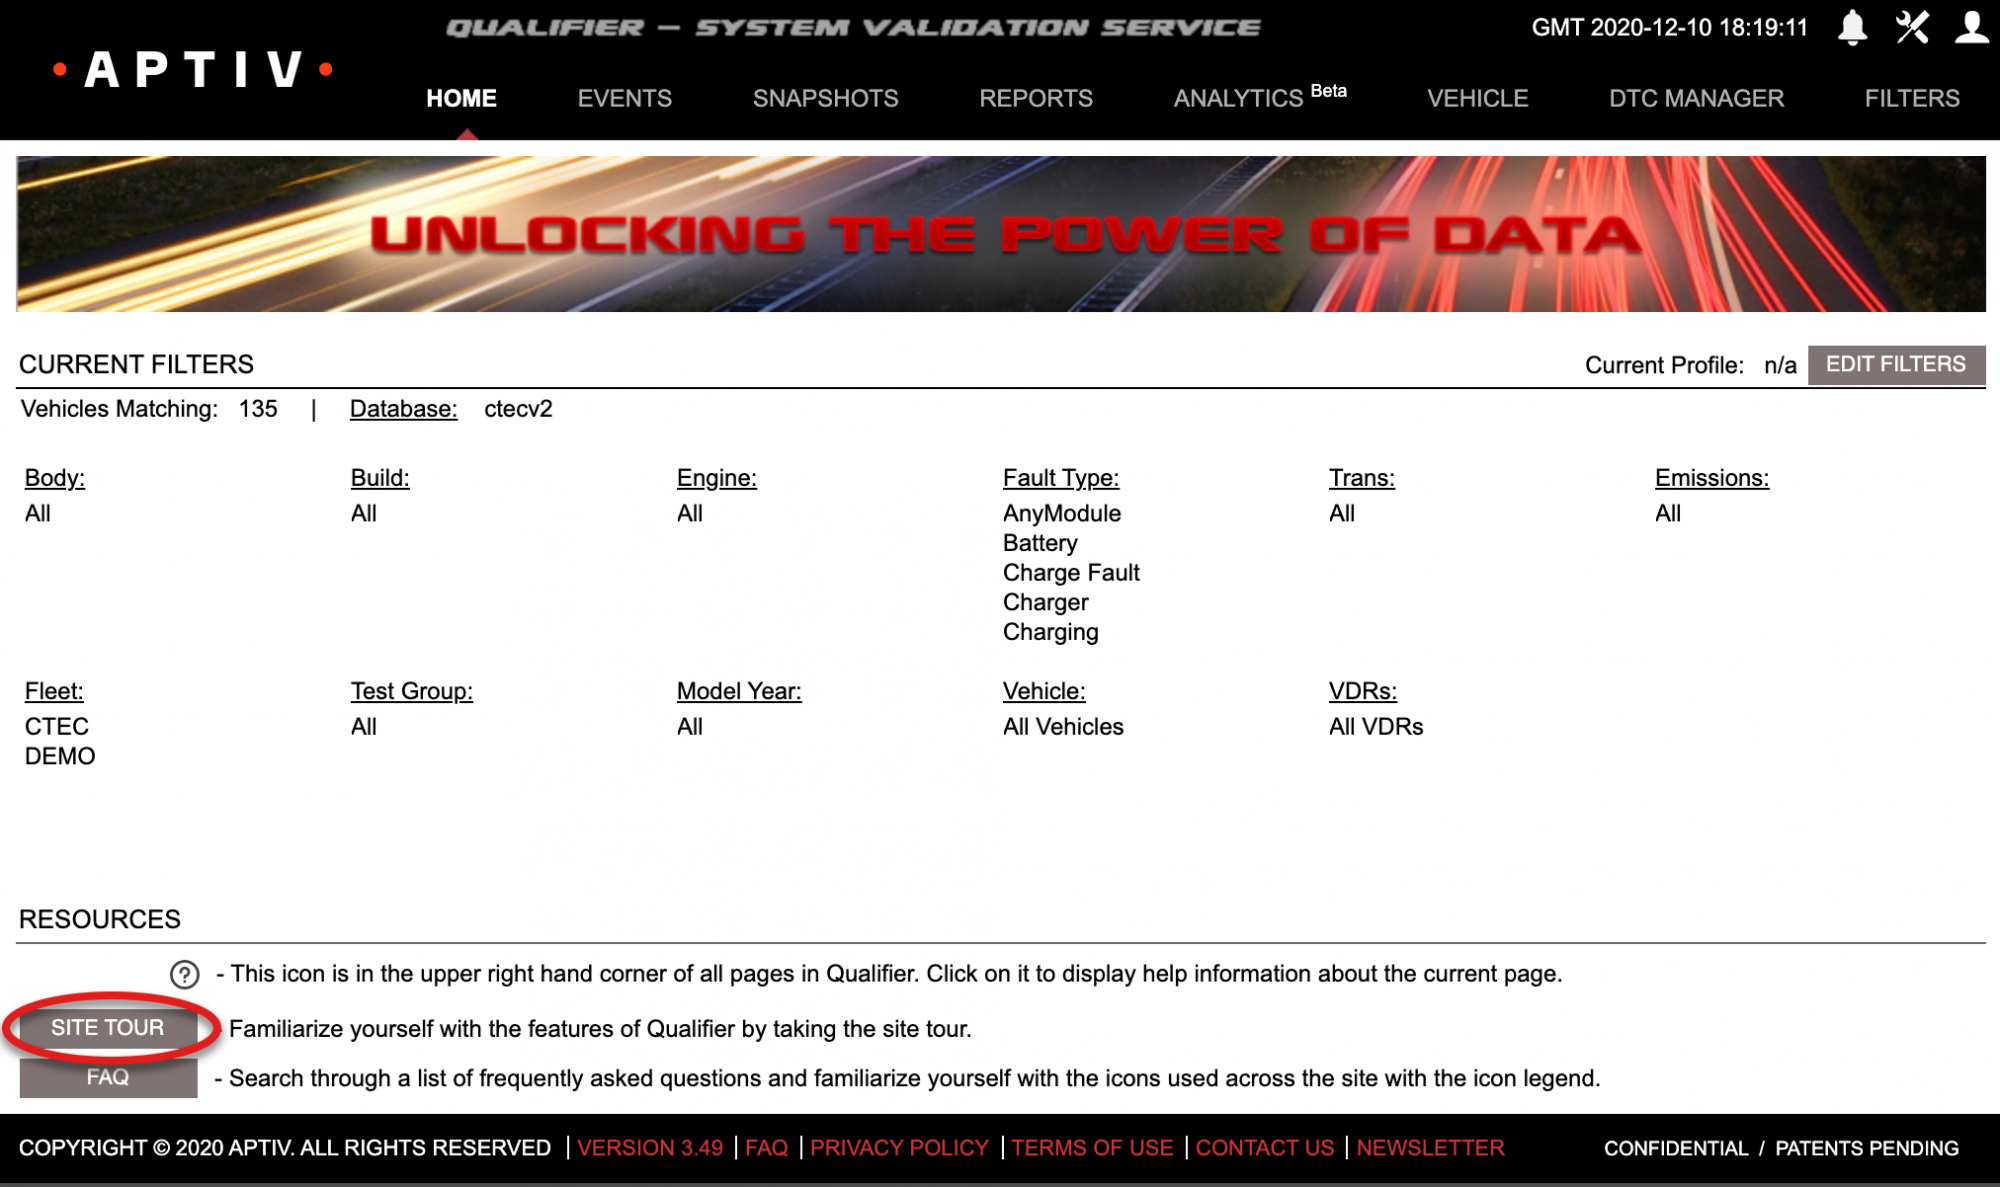
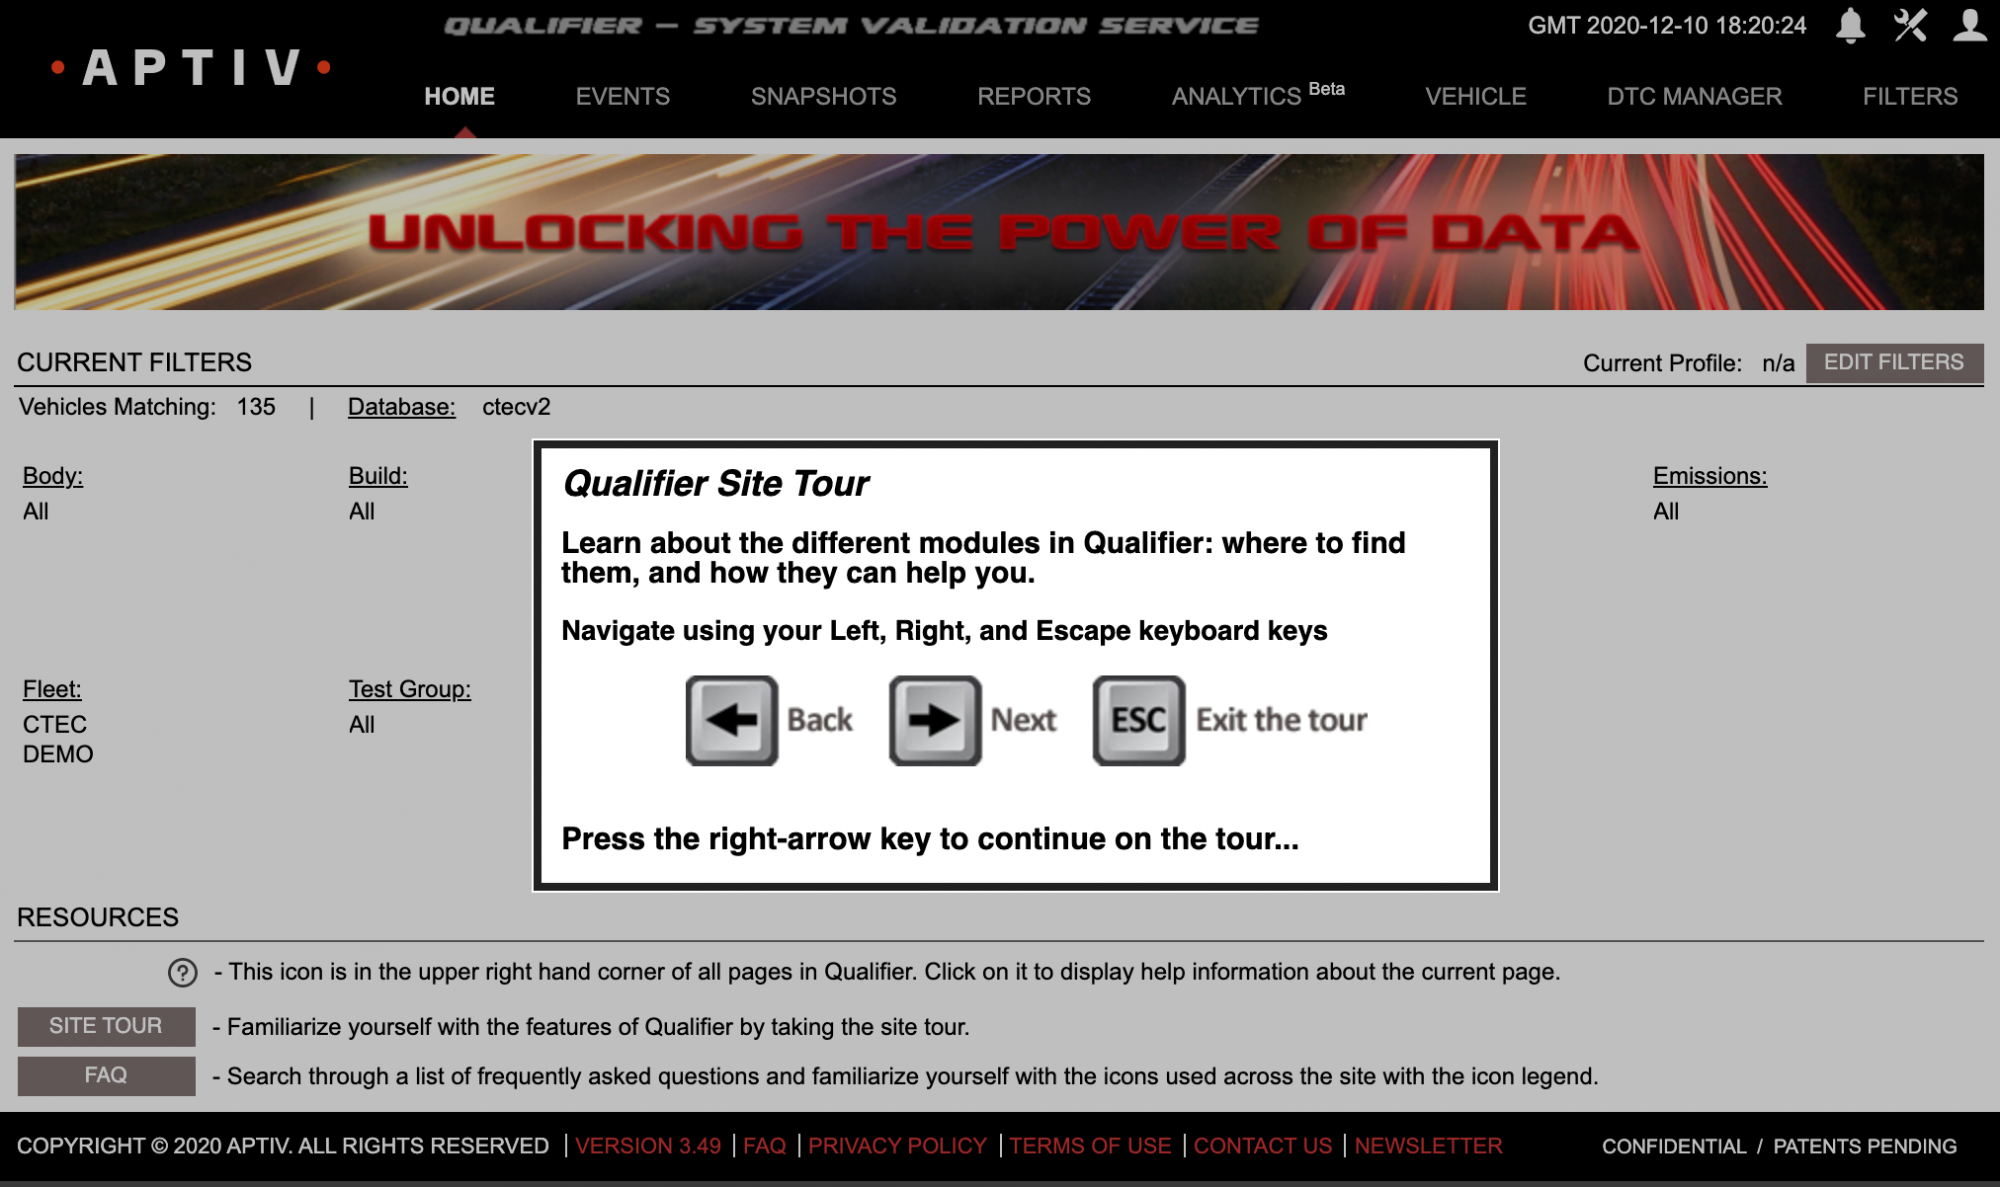
The site tour will guide you through the major sections of Qualifier. Follow the on-screen instructions and use the left and right arrow keys to navigate through the tour.
To exit the tour, press the Escape key.
FAQ and Icon Legend
Qualifier also has an FAQ section. Open it from the FAQ button in the bottom-left corner of Home or the FAQ link near the middle of the bottom bar.
The red FAQ link in the bottom bar is visible no matter what page you are viewing in Legacy Qualifier.
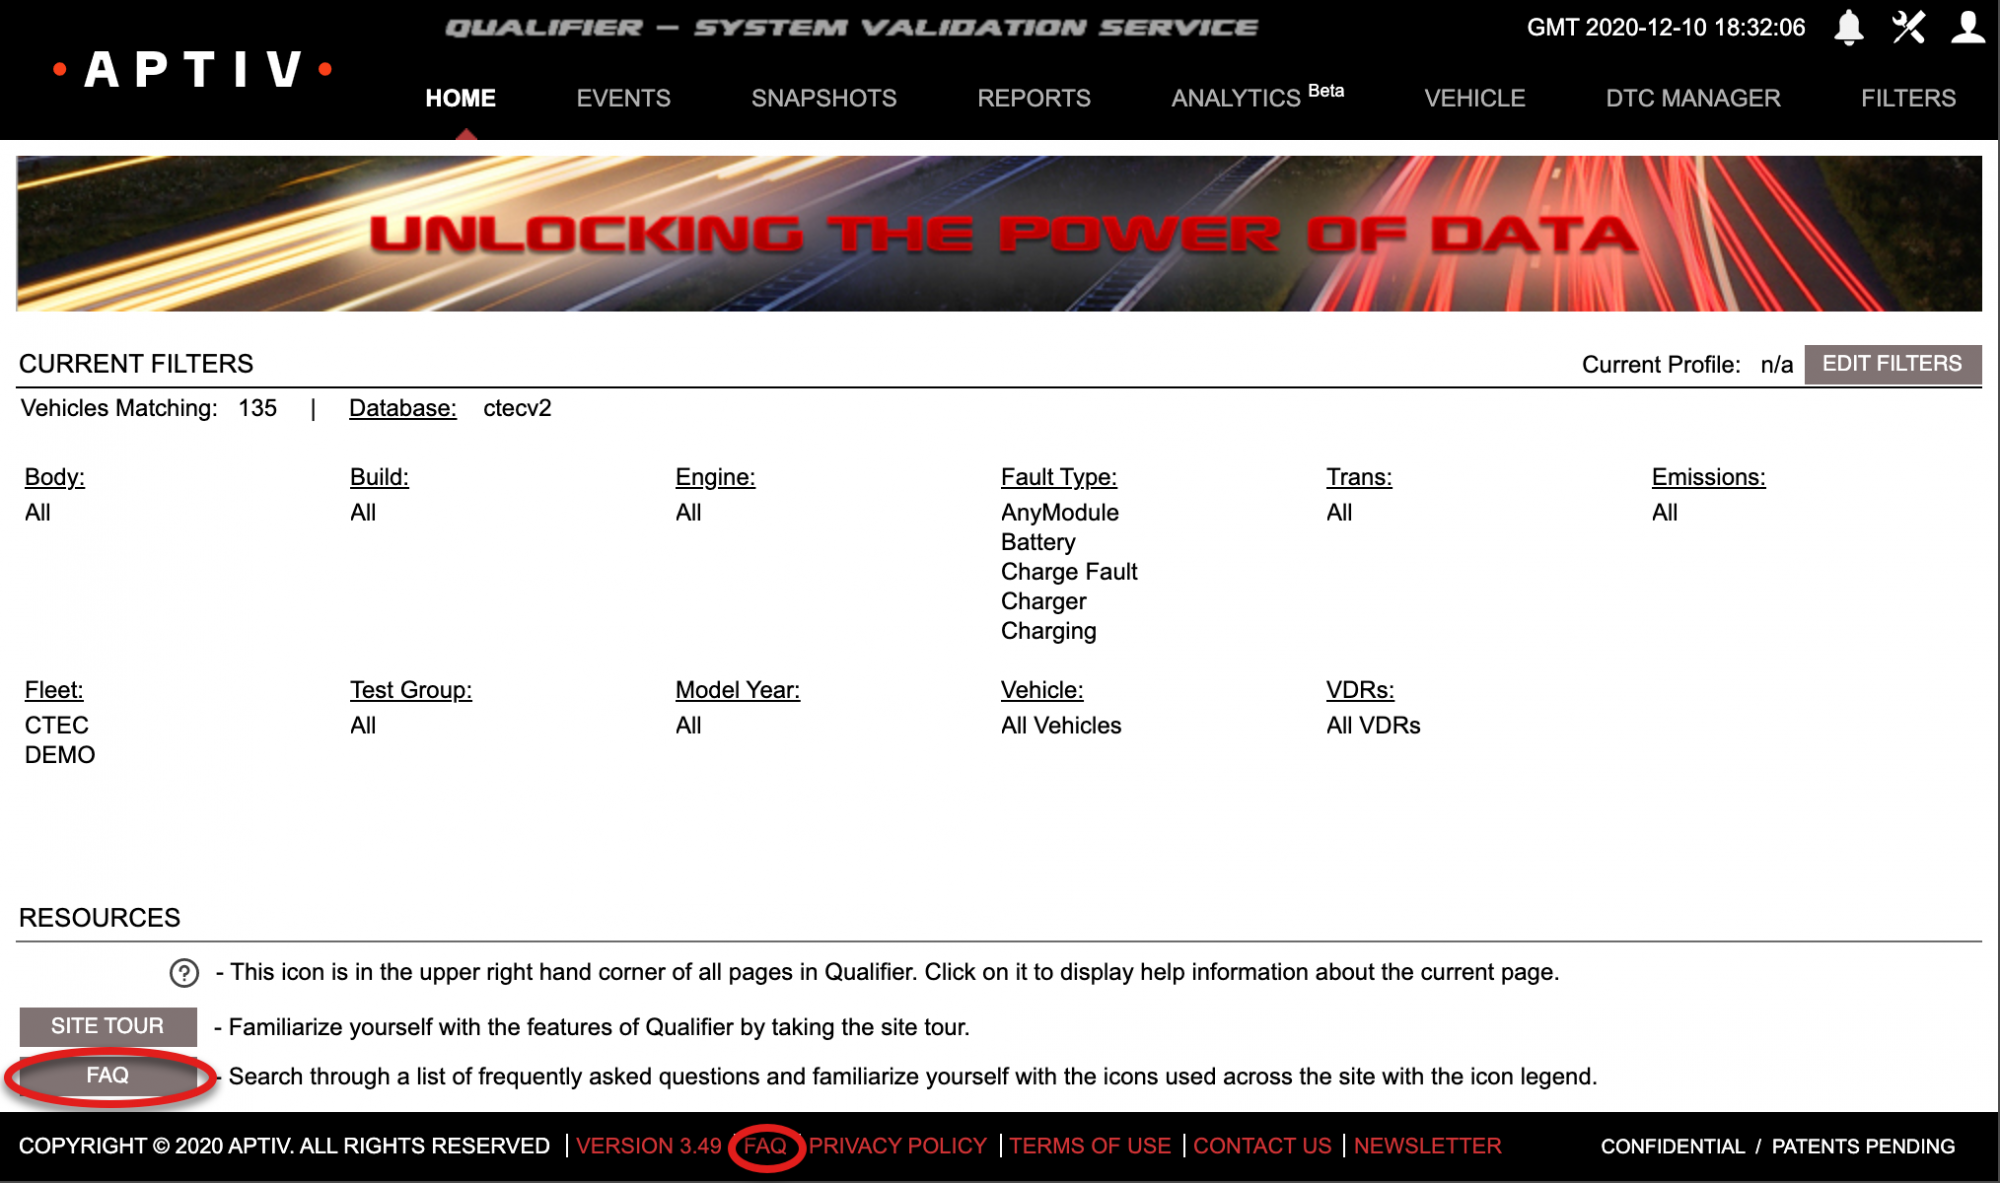
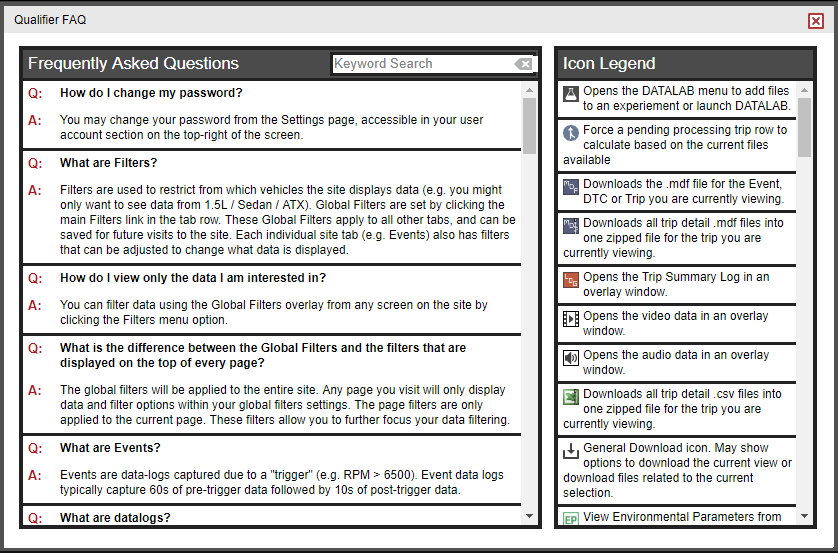
When clicked, FAQs will open in a pop-up window. You can use the Keyword Search box near the top of the window to look for a particular topic, or you can use the scroll bar to scan through the questions and answers.
On the right site of the window is a helpful Icon Legend section. Any time that you are unsure what a particular icon or button will do, you can check this legend to find out.
The support desk
This article provides instructions on how to submit support desk tickets from within both Legacy Qualifier and Next-Gen Qualifier.
- Overview
- Next-Gen Qualifier
- How to access the support desk
- How to filter and sort requests
- How to make comments or edit a request
- Legacy Qualifier
- How to access the support desk
- How to filter and sort requests
- Navigating the ACS Support Desk table
- How to make comments or edit a request
- How to create a new request
- How to cancel a request
Overview
Within Qualifier, the Aptiv Support Desk provides an easy way for you to communicate directly with Aptiv Connected Services. Through this tool, you can do any of the following:
- Report any issues with the software
- Request new features
- Notify us about config changes or new VDRs
- Submit questions
The Support Desk links directly to our internal ticketing system, and it will automatically update you (and anyone else you designate as a watcher) via email about progress or status changes on your request.
Next-Gen Qualifier
How to access the support desk
Click the headset icon (:headset:) in the upper right corner of the window to open the Support Desk, which will reveal in a drawer.
How to filter and sort requests
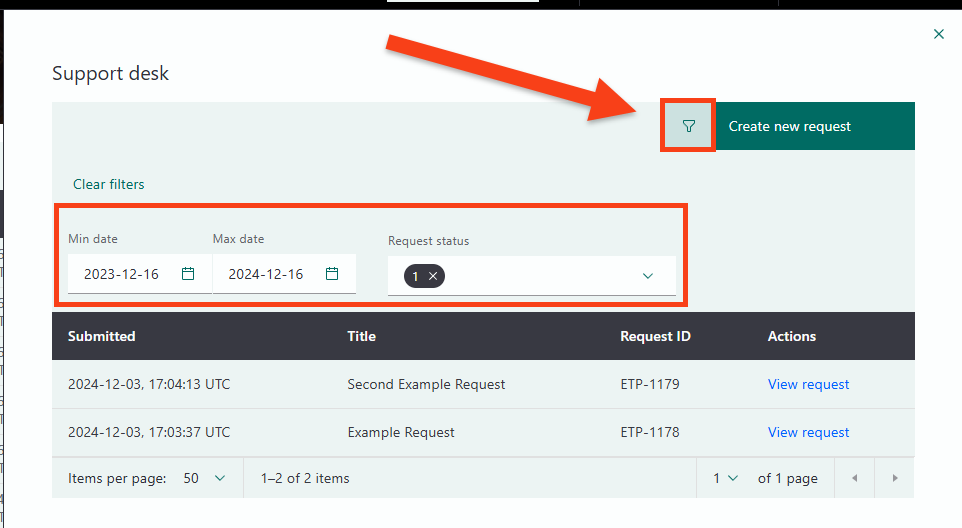
With the Support Desk drawer open, you can filter requests by clicking the filter icon to filter by date or status.
How to make comments or edit a request
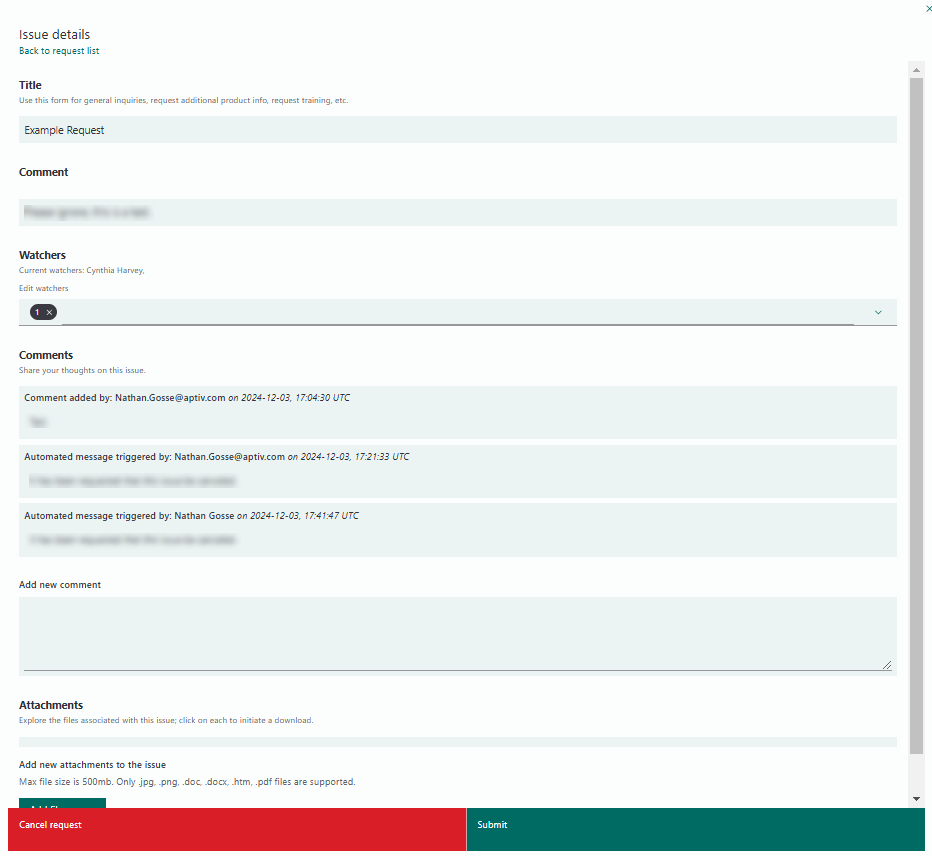
To make comments or edit a request, start by clicking View Request for the ticket you’re interested in.
This will open a drawer where you can perform the following actions:
- View (not edit) the request title, previous comments, and previous attachments.
- Edit watchers, add new comments, or add new attachments.
- Cancel your request.
When you have made your changes, click Submit.
Clicking Cancel Request will cancel the entire request, if you’d simply like to exit without making changes to your edit session, click the x icon in the upper right corner.
Legacy Qualifier
How to access the support desk
-
Click the workbench icon (:workbench-icon:) in the upper right corner of the window.
-
Click Aptiv Support Desk.
How to filter and sort requests
By default, the Aptiv Support Desk window will show you any support desk requests that you personally created.
To see other requests, click the filter icon in the upper right corner of the window.
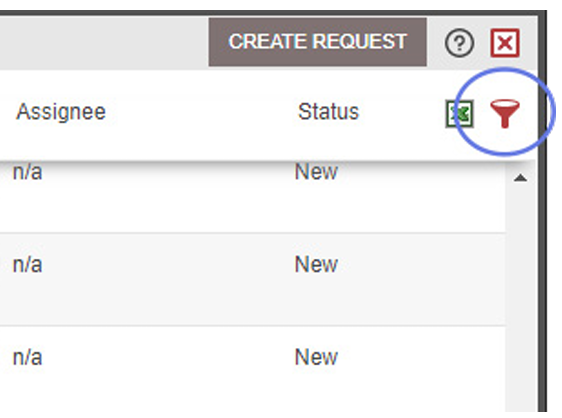
From the filter box, you can search for requests by the following criteria:
- ID number
- Title
- Date
- Request type
- Status
You can also click the down arrow in the Show Requests box to display requests that you personally created, requests that you are watching, the requests you created and the requests that you are watching, or all the requests created by Qualifier users at your company.
Remember to click Apply to apply the filters you selected.
Navigating the ACS Support Desk table
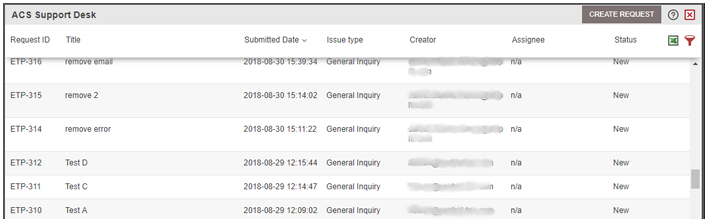
You can also sort the Support Desk list by clicking one of the following column headings across the top of the page: Request ID, Title, Submitted Date, Creator, Assignee, or Status.
Click once to sort in ascending order or twice to sort in descending order.
How to make comments or edit a request
- Click the filter request you would like to edit.
- Click the COMMENT/ UPLOAD button in the upper left corner of the request window.
- Edit the request as desired.
- Scroll to the bottom of the request window and click SUBMIT in the lower right corner of the window. (To exit without saving, click the X in the upper right corner of the window.)
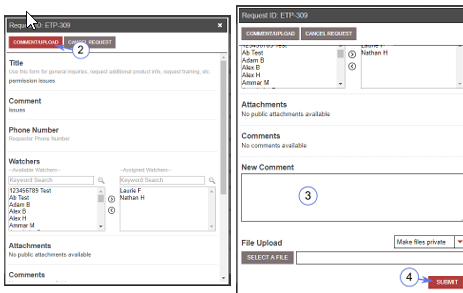
You can add watchers, upload attachments, or make comments in addition to editing the other details of the request in Step 3.
How to create a new request
- Click CREATE REQUEST in the upper right corner of the Aptiv Support Desk window.
- Select a request type from the drop-down list.
- Fill in as many details as possible in the request form. Note that fields with a red asterisk are required.
- Click CREATE in the upper right corner of the window.
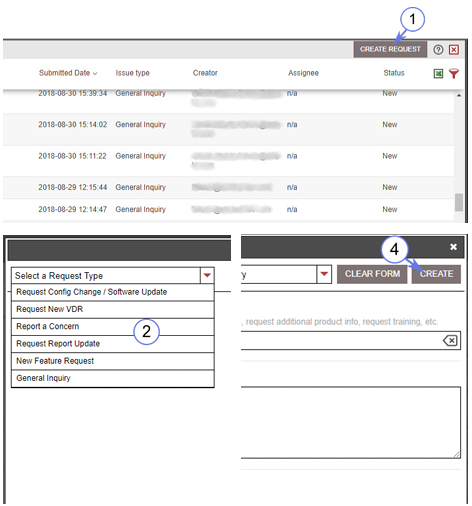
How to cancel a request
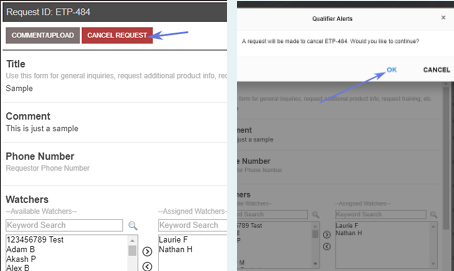
- On the Aptiv Support Desk window, click the request that you would like to cancel.
- On the request window, click CANCEL REQUEST.
- On the pop-up window that asks if you would like to continue, click OK.
The tools menu, notifications, and account settings
You must toggle to Legacy Qualifier in order to access these options.
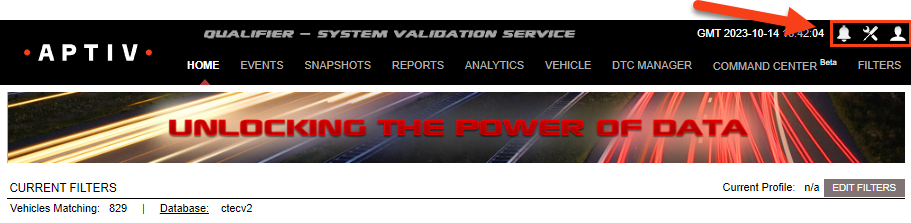
In the top right corner of Legacy Qualifier, you’ll see three icons representing the following menu sections:
- Notifications (bell icon)
- Tools Menu (wrench and screwdriver icon)
- Account Settings (person icon)
Notifications
The Notifications icon updates in real time based on your personal and organizational notification settings. Clicking the bell icon (shown in the screenshot below) will open the Notifications window that shows a list of all notifications:
Tools Menu
You access the Tools Menu by clicking the tool icon in the upper right corner of the window, opening the navigation menu shown in the screenshot below:
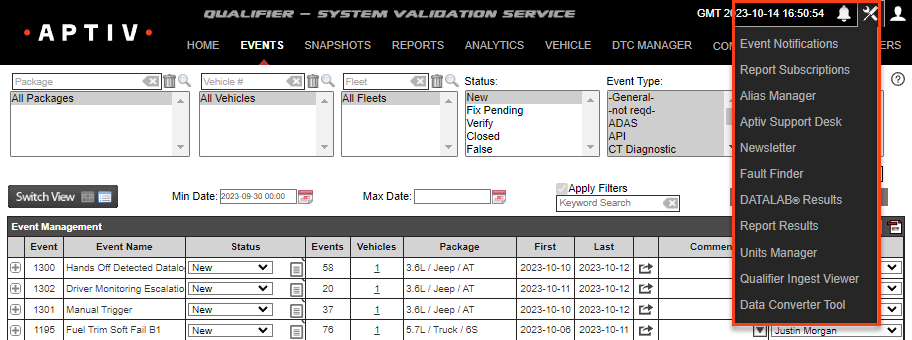
The Toolbox offers several different options, and you may not see all of them depending on your access level.
Below is a short description of the possible options:
| Item | Description |
|---|---|
| Event Notifications | Sign up to receive text or email messages when specified events occur in your vehicles. |
| Report Subscriptions | Sign up to have Qualifier email you reports on a regular schedule. |
| Alias Manager | Group related parameters together under the same name. |
| Aptiv Support Desk | Get assistance from your Aptiv customer support engineer (CSE). |
| Newsletter | Read newsletters and other resources from Aptiv |
| Fault Finder | Look up descriptions for DTCs. |
| DATALAB Results | Access the results of DATALAB experiments. |
| Qualifier Ingest Viewer | View files captured with non-Aptiv data loggers that you have imported into Qualifier. |
Account Settings
Next to the Tools menu is the User Account menu, which contains a link to your Account Settings and a Logout option.
Clicking the Account Settings button brings up the following screen:
(Note that your Account Settings screen may look different depending on your access level.)
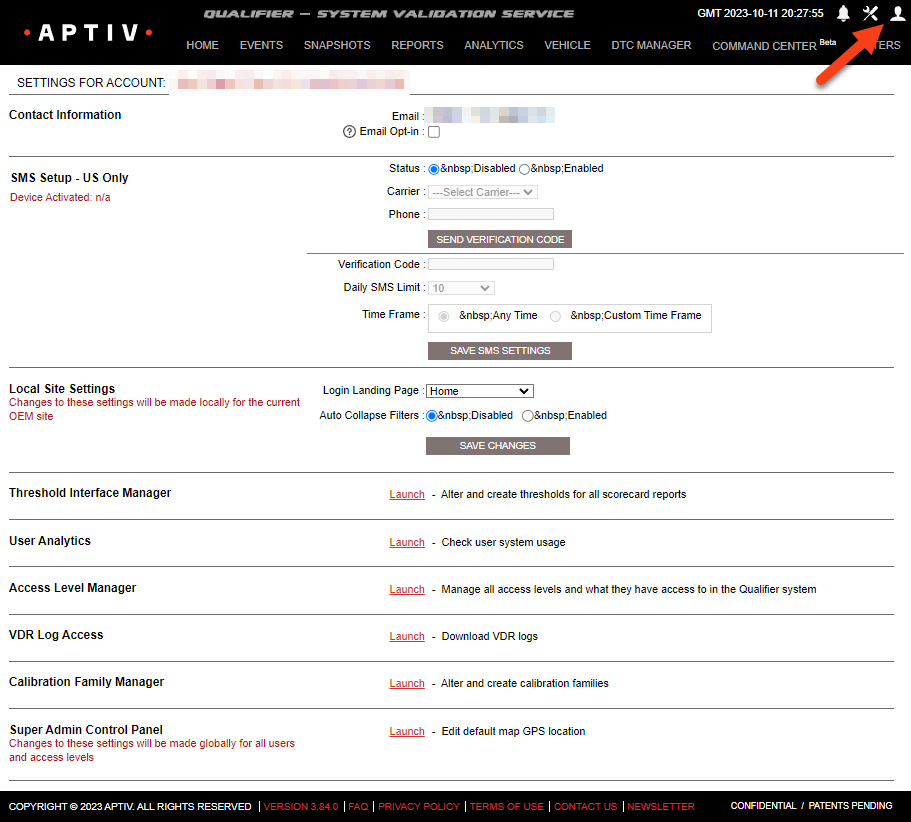
Page options are explained below:
| Item | Description |
|---|---|
| Change Password | Change the password you use for logging into the system. |
| Contact Information | Change the email address used for all communications. |
| SMS Setup | Enable and setup SMS text messages for notifications. |
| Local Site Settings | Offers options to change your landing page after login and ability to enable auto-collapse of filters on the Snapshots page once the data has been plotted. |
| Threshold Interface Manager | Set up thresholds for Snapshot data based on the package of the vehicle. Contact your Aptiv Consultant for more information. |
| Calibration Family Manager | Group calibration IDs into calibration Families to be used for grouping when plotting data and running reports. Please contact your Aptiv Consultant for more information. |